Cricket Chirper - Laughing Locust
.jpg)
Cricket Chirper/Laughing Locust
This craft would be perfect for a series on creation, The Walls of Jericho (instead of trumpets), a craft for a camping/farm themed VBS, Making a joyful noise unto the Lord, and many more. You could create these while teaching Moses and the plagues and call them laughing locusts or some other fun name.
Super easy craft!
2 small dowel rods per child (measure you bead opening before purchasing). You can purchase these in packages of approximately 20.
20 beads per child
Hot glue gun/Glue
Before class, glue one bead to the end of each dowel rod.
Allow the children to string 10 beads onto each dowel rod.
When finished, hot glue the last bead into place.
Hint: Look around thrift stores (or make your need known to the church) for one of the old beaded car seat back massagers. (Pic above for reference...they may come in different styles) You can snip the threads and end up with hundreds of wooden beads...perfect for making cricket chirpers! If you cannot find a used one, new ones can still be purchased, and the price is much more cost-efficient than purchasing all the beads (unless you find a good deal.)
Hold the two ends of the dowel rod and rub the two stick together creating a chirping noise!
Beaded Serpent/Snake Craft/Pull Toy


I normally have the children make this craft when I teach on Adam and Eve or a Western themed VBS. What ideas can you come up with? Comment below!
This craft takes a bit of preparation. You may want to divide the different duties up between several leaders or host a work day with several volunteers helping to prep them.
There are many options for these snakes. I always make the heads out of clay however, you can make them out of foam, heavy cardboard or anything that you choose. You can also substitute the beads with paper chains or small lengths of plastic straws (see post below this one).
Prior to class
Shape snake heads out of baking clay (or cut them out of heavy cardboard or fun foam.) You can find the baking clay at Hobby Lobby or any other hobby shop. You can make the heads any size that you choose. Making sure that they are at least slightly larger than one of the beads.
Press little wiggly eyes down into the clay and then remove for baking.
Press small indentations into the snake head to resemble nostrils.
Run a skewer through the head. Start at the mouth area and run through the head towards the back. This hole will need to be large enough for your needle and yarn to run through it. Note, the clay will shrink slightly.
Reshape the head if needed and then run the skewer through one more time.
Bake according to clay directions.
When cooled, run a string through the head leaving about 24” of string sticking out of the mouth area and about 36” sticking out the opposite end.
Cut a little sliver of red felt for the tongue. Cut one end into a fork shape.
Stick one end of the red felt- (straight edge) into the mouth opening and glue the felt into place. Squirt extra glue into the mouth opening to make sure the tongue and string stay in place.
On the opposite end of the yarn, use a dull pointed needle. Note: You can purchase packages of plastic sewing needles with large eyes and rounded tips. They are perfect for this craft.
Child’s Part
Give each child a baggie full of beads. Have them string their beads to create as long of a snake as they wish.
Finishing off the snake:
Run the needle through and around the last bead several times and then finish off by knotting it several times. You may choose to put a drop of hot glue on the knot to prevent it from coming loose. Clip off the yarn.
For an easier snake craft, scroll down to the post below.


Your Baptism Bag

This Baptism bag is to help the children understand how important their baptism is.
Give the child being baptized a white bag with the following items inside the bag.
You can add to (personal letter, etc.) or take away any item you choose.
Attach these sayings to each item...or place a sheet with the information inside the bag.
The WHITE BAG is to remind you of how PURE AND CLEAN you are now that you
have been baptized.
The WASHCLOTH is to remind you that you have been washed free of all your sins.
The warm BLANKET is to remind you that the Holy Spirit will comfort you and
give you strength when you choose the right way and have to stand alone.
The Holy Spirit will be a shelter in times of dark and stormy weather.
The BOTTLE OF WATER will remind you that you were baptized by IMMERSION, just like
Jesus was. After your baptism, you received a special GIFT,
the gift of the HOLY SPIRIT.
The pack of gum will remind you to ALWAYS “Chews” (choose) what is right even
if your friends may “Chews” (choose) not to STICK beside you.
The LIP BALM is to help you remember that the Holy Spirit will SPEAK to
you in a still small voice.
The SOAP is to remind you that you must have clean thoughts and actions to
feel the Holy Spirit.
The EARBUDS will help remind you to always LISTEN to the Holy Spirit so
you will always choose what’s right.
The RULER is to remind you that the Holy Spirit is a TEACHER. The Holy Spirit will
help you understand and know the truth as you study the scriptures and learn.
The CANDLE is to remind you that the Holy Spirit will LIGHT YOUR WAY and
help you walk along righteous paths.
The SNICKERS BAR will remind you that sometimes, your friends, classmates,
or peers will snicker at your righteous choices. It is a reminder NOT to listen
to the “Snickers” and listen to what you feel is right.
The LIFE SAVERS will remind you to share the gospel. You may be the only person
who shares the gospel with them. Be a life saver…share Jesus with others.
The HEART Sticker will remind you just how much Jesus loves you.
He wants you to show your LOVE for Him by obeying the commandments.
Always stay close to Him!
Beaded Bubble Wands

The words of a man’s mouth are deep waters; The fountain of wisdom is a bubbling brook. Prov 18:4
A GREAT Bible lesson for your Bubble Night would be a lesson on wise King Solomon
Start your bubble wand by gathering sturdy wire and colorful wooden beads.
Make sure the holes in the beads are big enough for two wires to run through them.
Fold the wire in half. Don’t crease it, Just measure an approximate halfway mark.
On the folded end, form a 2" inch in diameter circle. When you are happy with your circle, twist
the wire once or twice to hold its shape.
Run both wires through each bead. Leave room at the end to form another circle (large enough to prevent the
beads from falling off) and secure by twisting the wire. Make sure to fold any sharp edges under or run the end of the wire
back through the last bead.
Want to pass out a fun gift on bubble night? Make a bubble wand for each child. Attach the wand to a bottle of bubbles.
run a piece of helm ribbon around the rubbles and tie into a know. Run the end of the ribbon through a copy of the scripture
and tie it into a bow.
Looking for more bubble fun? Check out my Super Duper Bubbles Night.
Drinking Straw Serpent/Snake Craft/Pull Toy

Serpent / Snake
Teaching on Adam and Eve, The Garden of Eden, Moses, Satan, etc?
Grab the childrens attention by creating these simple drinking straw snakes.
This craft is perfect for pre-schoolers or older children as well.
Just gather some colorful plastic straws, yarn, googly eyes, fun foam, a hole punch, and some blunt tipped needles and you are ready to go!
1. Trace out the snake head onto fun foam. You can either do this in advance or allow the children to do this step.
2. Punch a hole in both ends of the head. (see picture above)
3. Cut approximately 3" lengths of plastic straws (various colors)
4. Cut a long piece of yarn. Tie (knot) one end of the yarn through the hole at the top of the head.
5. Run the other end of the yarn through the eye of a blunt tipped needle. It is ok to tie a small knot in the yarn to keep the needle attached.
6. Have the children run the needle through the bits of colorful straw until they fill their piece of yarn.
7. Once they have reached the end of the yarn, run the needle back through the last straw two or three times (whip stitch) and tie a knot to keep the straws in place.
8. Cut the needle off of the yarn.
9. Tie a second piece of yarn (long) through the second hole (mouth). This will be the string to pull the toy along the ground so make sure it is long enough to pull. 3' is normally long enough for a small child.
10. Allow the children to glue the tongue and googly eyes onto their snakes.
That's it!
If you would like another snake/serpent craft, scroll to the craft above this one!
Salvation Bracelet - Adjustable
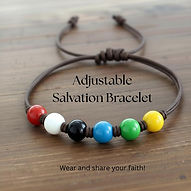
For this bracelet, you will need:
Pony beads - Red, black, white, blue, green,
yellow, and clear.
A strip of leather or soft, durable string.
String all the beads...except for the clear bead.
Center the beads on the string and tie a
knot on each side to secure the beads in the center.
Run one end of the leather through the clear bead.
Going the opposite direction, run the second end of the leather through the clear bead.
Tie a knot at both ends. This will allow you to make
the bracelet larger or smaller.
The black bead represents Sin. We are all sinners.
The red bead represents Jesus’s blood, shed on
the cross for each of us. Jesus died for each of us.
The white bead represents the forgiveness of our sins.
Our sins are forgiven when we admit we are a sinner,
ask Jesus to forgive our sins, and accept Him as our
Lord and Savior. When we do that, our sins are
washed away.
The blue bead represents Baptism - Where we publicly acknowledge...in front of everyone that Jesus
is our Lord and Savior. We put away all of our old sinful
ways and choose a new life...a life of living with and for Jesus.
The green bead represents Growth.
When we live a life for Jesus, we will continually
grow in God’s Word and God’s Ways.
The yellow bead represents Heaven - When we
accept Jesus as our Lord and Savior, our sins are
washed away. Nothing is separating us from God.
So when we die...we will go to Heaven, where the
streets are made of gold...and we will live with Jesus for
all of eternity.
We don’t know a lot about Heaven but we do know that it is a place without sin. There is no sadness in heaven.
In Revelation 21:21, we read this:
The twelve gates were twelve pearls, each gate made of a single pearl. The great street of the city was of gold, as pure as transparent glass.
This is represented by our clear bead.


Remember and Honor (Memorial Day)
Looking for a memorable way to honor those who fought and gave the ultimate sacrifice or those who served our nation with honor?
It's easy
1. Purchase several packages of plastic army men
2. Purchase cans of Red, White, and Blue Spray Paint (OPTIONAL). You do not have to paint your army men if you choose not to.
3. Divide your army men into three groups
4. Paint one group red, one group white, and one group blue. Let dry completely, turn over, and paint the backs. Let dry!
5. During the "time of remembrance at your church, allow the children to pass out one army man to each person.
6. Instruct members to carry their soldier in their pocket or place them in an area or prominence...where they will notice them often.
7. Encourage your members to pause and pray for the families of the fallen...or those currently serving our great nation.
Alternative: Place the army men in a basket with a sign attached. Instruct your members to take a soldier, place it in their pocket or place of prominence...and pray for the families of those who have given the ultimate sacrifice for our nation.
Place the basket in an area where members will notice and pick up an army man on their way out of the worship center.


Fruit of the Spirit Wall Art

5-Day Fruit of the Spirit Craft - Looking for a VBS craft that the children will take home and actually keep? Would you like a craft that will take all week to complete? Need a craft with a powerful punch? Then this craft is for you!
Fruit of the Spirit Wall Art!
Start by gathering a large paper grocery bag for each child and writing their names on the front. All pieces of their craft are to be placed inside their bag (this may vary depending on how you choose to make your craft). Keep each group/team in a separate area and have the children return to the same spot when finished each day. This will allow the children to come in and easily grab their bags.
This craft does take some time to prepare, but no longer than preparing 5 crafts for each child. If possible, set up enough tables so that each group can have its own table(s) (cover the tables with paper for each cleanup)
Each bag should contain 9 boards (or heavy cardboard pieces if you have access to them). Each board should measure approximately. 4" X 8." The men at our church prepared all the boards for us, and we used old pallets to cut the boards from. Pallets are easy to find, and most of the time, you can find them for free. If you cannot find pallets, check for scrap pieces of lumber at a lumber yard near you or perhaps a builder, a subdivision that is being built near you, etc.
Day One - Provide Strips of Sandpaper and 2X4 blocks of wood that have been wrapped with sandpaper and secured with flat thumb tacks (you can nail the tacks into the wooden block). Make sure you have enough blocks or sandpaper strips for each child on the team/group. Have extra sandpaper cut to size and available to replace any torn sandpaper. On day one, the children are to sand their pieces of wood to remove any rough spots. Even the youngest of children love to do this.
Day Two - Provide paint brushes, paper plates, and a variety of paint colors. Allow the children to paint all 9 of their wooden pieces any color they choose. This is why giving each group its own tables is best. The paint will have to dry on days 2, 3, and 4.
Day Three and Four - Children will paint the names of the 9 different "Fruits of the Spirit" on their boards as well as add dots, stripes, whatever they choose. Make sure to have the children finish their first board, "Love" on day three. It is also a good idea to have the 9 fruit names on display so that you do not have to help children spell the words. They can simply look at the display!
Day Five - Assembly - It is a good idea to have extra hands available on this day. Children will assemble their boards and take them home. See the Assembly below!
There are several ways that you can assemble your boards.
Option 1 - Flip all boards over in the order that they should appear. Line them up in a straight line. Supply a long piece of ribbon for each child. The ribbon will be hot-glued to the back of each board. Glue the ribbon to the backside of each board (up the left side), leaving a loop at the top for hanging, and then hot glue the ribbon down the right side of each board. When finished, run hot glue horizontally over the top of the ribbon on each board. You can also use a staple/nail gun to make sure the boards stay adhered to the ribbon.
Option 2 - For a more rustic and secure wall hanging. After the children have completed their boards on day 4, take the "Love" board and attach two screws on the back of the board to create the hanger. (This is why you want the children to complete their "Love" board on day three...so that it is completely dry).
Place a thin strip of wood (or heavy cardboard) down the center (back) of the wall hanging and staple with a staple/nail gun (making sure that your staple/nail are short enough as to not go through the front of the board.) Experiment with what you have! There is no right or wrong as long as the boards stay together.
Wind a piece of wire around the two screws creating a hanger. Tie a piece of fabric 2"X12" around the wire and into a bow.
Get some of your men...with power tools involved. They love is just as much as the kids!
Tip: Having some old T-shirts to slip over younger children's clothing is a good idea!


Frog Whistles
Super Simple Craft - Frog Whistles
Trace and cut out the frog template (fun foam or heavy hardboard), cut a slit on the X and stick the whistle through the hole.
Children will blow on the whistle (from the back side), and the whistle will expand to look like a frog's tongue.
A great craft for Moses and the Plagues, Hoppy New Year or Make a Joyful Noise.
You can also have the children glue googly eyes on your frog and accessorize to your choosing!
Hint: You can get party horns for almost nothing after New Year's or other holidays! Snag and save!


Friendship Bags


Friendship Bags - This craft is a great Father's Day gift, or it can be used with any lesson on friendship.
Friendship Bags
Make or Purchase: Tip: Raid your supply closet, many of these items may be found there
Small Bags, Life Saver, Cotton Ball, Rubber band, Candy Kiss, Paper Clip, Candle, Marble, Sweet and Sour Candy,
Happy Face Sticker, Band-Aid, Recipe, Eraser, Tooth Pick, Tea Bag
Attach a ribbon around the top of the bag and string the poem onto the ribbon. Tie in a bow.
Instruct the children to give to their dads, grandpas, or best friends!
Friendship Bag
Life Saver: To remind you of the many times others need your help and you need theirs.
Cotton Ball: Cushioned support of friends for the rough roads ahead.
Rubber Band: Reminder to stay flexible.
Candy Kiss: To remind you that everyone needs a kiss or a hug everyday.
Paper Clip: To help hold it all together.
Marble: To help you keep rolling (or in case you lose one of yours)
Sweet and Sour Candy: To help you accept and appreciate the differences of others.
Happy Face: Smiling not only increases your face value, it’s contagious.
Band-Aid: For healing hurt feelings, yours or someone else’s.
Recipe: When you want to do something special for someone, a symbol of sharing.
Eraser: To remind you that everyone makes mistakes; and it’s OK
Toothpick: To remind you to pick out the good qualities in others
Tea Bag: To remind you to relax and go over that list of blessings.
Kaleidoscope
Fun for all ages!
Create this colorful kaleidoscope when teaching about "The Wise Men following the star", "Creation," or any other lesson on stars or the heavens!

For this craft, you will need one canister per child. Crystal Light canisters are perfect however a pringles can will work as well.
Tip: If you cannot find a canister, you can use a cardboard tube and 2 black balloons. Cut the neck off of one balloon and stretch it over one end of the tube. Place everything inside and the repeat with the other balloon.
Measuring your reflection mirror:
You will need 1 piece of heavy card stock per child.
Begin by measuring the size of your tube.
Width
Measure the circumference of the tube and then multiply by 3.
For instance, if your tube is 3"across, you would multiply 3X3 which equals nine.
Now subtract 1/2" from your total making the magic number 8.5"
Height
Take the inside height measurement of your canister/tube.
From the bottom (inside) of the container to the top. Stop your measurement just below the lid level.
Now take off 1/2"
Let’s say your container measures 6” from top to bottom. Now take off about ½” making your
measurement 5 ½”.
This will leave your measurements as 8.5" X 5.5"
Cut a piece of cardstock/ cardboard using these measurements.
Once cut, cut a piece of aluminum foil that is larger than the cardboard and wrap the cardboard with foil. Only one side has
to be wrapped completely.
Fold the cardstock/cardboard into thirds. (Long side/height.) Foil so that the foil in on the inside of tube).
You will now have a triangle shape piece of cardboard with the foil on the inside (reflection mirror)
Wrap a piece of plastic wrap over one end of the triangle and tape securely.
Drop several clear, colorful beads into the tube.
Drop the triangle into your tube.
Please note, you may have to shorten your reflection mirror (triangle cardboard) if you are planning on using LOTS of beads
or if your beads are on the larger side. Do a test run before cutting all of your reflection mirrors and adjust to fit.
Place the lid on the canister and cut a small hole in the top (about the side of the circumference of a pencil.
You may want to use a drill to make all the holes prior to class.
If using a balloon for the ends, poke a very tiny told in the tip of the balloon with a large needle.
Cut off the neck of the balloon and stretch it over the tube. Use a piece of strapping tape to hold both balloons in place.
Now, simply decorate your tubes with shiny paper, stickers, ribbons, etc.
Daniel in the Lion's Den Craft
4 Simple ways to finish off your craft!
_edited.jpg)
This simple craft is great for pre-schoolers or younger children however, older children LOVE it as well.
There are 4 ways to finish off your craft however they each begin with a paper plate.
Now the fun begins!
Lion # 1
For very young children, Cut out the lion's face and glue it onto the center of your paper plate.
Allow the children to color the lion's mane (edges of the paper plate). Each cut piece can then be wrapped around a pencil to curl the edges towards the face.
Lion #2
Cut out the lion's face and glue it onto the center of your paper plate.
Provide the children with bits of yarn...browns, tans, etc. and allow them to glue to bits around the edges of the paper plate to create the lion's mane
Lion # 3
Cut out the lion's face and glue it onto the center of your paper plate (Foam or heavy paper plates are best for this lion. If you can find yellow or brown plates, it's even better.
Have the children punch holes around the edges of their paper plate. 10 holes is a great number.
Provide them a long piece of yarn (browns, tans, multi colored, etc) and a plastic blunt ended needle.
Children will whip stitch around the edges of their lion.
If a child gets their string tangles, simple snip the tangled yarn and tie the two ends together in a simple knot. Snip off the extra yarn.
Lion # 4
For very, very young children, you can duplicate the lion's face and mane and allow them to glue the mane onto the plate and then glue the face on top of the mane.


Sewing Cards


Sewing Cards!
Sewing Cards are super easy to create and fun to do!
Simply trace out a pattern onto thick card stock or cardboard, punch holes around the edges, tie a piece of yarn through
one hole, and add a blunt-ended plastic needle to the other end. Let the children create their own craft.
Samuel's Coat of Many Colors, a whale, a fish...a frog...the possibilities are endless!
The object is to start in one hole and go around the edges of the entire pattern; however, many children will
choose to criss-cross their pattern and hit one random hole after another...and that's ok. It's their art, so let them create!
Barley Loaves and Fishes

Simple, copy, cut, and paste activity!
Using brown cardstock or thick paper, copy one basket for each child.
Using light brown or manila cardstock or thick paper, copy 5 loaves for each child.
Using orange cardstock or thick paper, copy 2 fish for each child.
For small children, cut out all the patterns and supply them with glue.
For older children, supply them with scissors and glue.
Instruct the children to cut out and glue their 5 loaves and two fish onto their baskets.
The Good Samaritan
Doctor's Mirrors and Nurse's Hats


An oldie...but always fun! One of my favorite crafts goes along with the Good Samaritan lesson. Whenever I teach this lesson, the children create either a nurse's hat or a doctor's head mirror. One child is selected as the Good Samaritan, and the rest of the children apply band-aids, cloth bandages, take their blood pressure, and listen to their heartbeat. It's a fun, hands-on way to learn about being a Good Samaritan and loving one another!
Doctor's Light
Nurse's Hat
Paper Dolls
Teaching a lesson on friendship?
4 Helpful Friends,
Shadrach, Meshach, and Abednego,
David and Jonathan,
Ruth and Naomi, 12 Disciples, Joshua and Caleb, etc.
Paper dolls are a fun...and often forgotten tool/craft to help instill the message of friendship!
For even more fun, allow the children to draw or color on their paper dolls...explain that each doll/person is unique, special,
and important to the other.
You can also use paper dolls to explain the body of Christ...how it takes each of us...joined together...to share
the Gospel and expand the Kingdom of God!
%20(11%20x%208_5%20in)%20(2).jpg)
Fishers of Men
"Follow me and I will make you fishers of men." Matthew 4:19
Create this simple "Fishers of Men" craft using items you may already have around your house!
Easy to make...and it can be hung on the wall as a wonderful reminder!
Purchase 4 tongue depressors, one net bag, a piece of ribbon and a small bow, fishing bobboer or anything you choose to decorate your bag. (One per child)
Trace 3 "fishers of men" out onto craft foam and cut out. (3 per child...any color)
Place one tongue depressor behind the bottom of the bag.
Squirt hot glue onto the tongue depressor and bag.
Press the secod tongue depressor on top of the first and press hard. Securing the netting between the two tongue depressors.
Place the 3 fishermen inside the net bag. Note it is ok if the 3 men are overlapping in the bag.
Repera this gluing process for the top of the bag.
Hot glue a ribbon to the back of the craft for hanging.
Hot glue a bow, small bobber or fishing item to the corner of the craft.
Write the scripture onto the tongue depressors.
Bag Options:
-
A small fishing net cut into rectangle shapes and sewn down both sides and across the bottom to form a bag. This is my favorite option.
-
A Produce net bag cut into ectangle shapes and sewn down both sides and across the bottom to form a bag.
-
Sheer wedding rice bags (remove the drawstring)
-
Any other bag or netting you choose.
-
Note: You can make the bags as long as you choose however, the width will be determined by the length of your tongue depressors.

Lydia the Seller of Purple
Marker Tie Dyed Shirts
A new twist on the traditional tie-dyed shirts
Gather the following items
One t-shirt per child (You can dye anything you choose...cotton fabric...even a piece of fabric)
Permanent Markers
Several squirt bottles (Condiment squirt bottles work great)
Rubbing Alcohol
Rubber bands
Red Solo Cups
Place a small section of the t-shirt over the red solo cup (single layer)
Secure it with a rubber band
Create an art drawing inside the circle with the permanent markers
Squirt (liberally) the section of the t-shirt with rubbing alcohol to make the ink run.
Let set a couple of minutes to finish running.
Move to another section and repeat until the shirt is full of colorful art.


The Big Change
(Saul/Paul)
Therefore, if anyone is in Christ, the new creation has come: The old has gone, the new is here!
This simple craft can be used for a lesson on Saul/Paul or for anyone starting a new life in Christ.
Duplicate the template onto a sheet of
colorful paper. (One per child)
Fold the template in half (along the
solid center line) and cut out the caterpillar.
Do not cut along the folded edge.
Open the caterpillar to see the big change.
Add antenna, dots, bits of colorful paper
or whatever you choose.

Giant Ice Block

Looking for a "unique"
way to cool off this summer?
Try a GIANT Ice Block!
Easy to create...You just need a tub, some water, a few plastic
frogs and a freezer.
1. Locate a giant tub
2. Add 3-4" of water
3. Toss in a few plastic frogs
3. Freeze
4. Add 3-4" of water
5. Toss in a few plastic frogs
6. Freeze
7. Add 3-4" of water
8. Toss in a few plastic frogs
9. Freeze
Continue until the entire tub is full.
(This will take approx 1-2 weeks to fill and freeze solid)
Just add a little water each day until it is full.
On reveal day, just turn the tub upside down, allow to sit for 10-15 minutes, and dump it out.
Allow the kids to take turns sitting on the block of ice and then hand out plastic knives, squirt guns, and/or squirt bottles and allow them to "free the frogs" by chipping away at the ice.
Each frog that they successfully free...hops home with them!
(Frogs can be purchased from Oriental Trading. Add anything else that you would like to add.)
An ice block can be added to any summer activity!


Time, Talent, Tithes
T-Shirt Design
Teaching a series on tithing?
Want to make it stick?
Create these cute t-shirts with your children to help them
Remember the 3 T's...
Time, Talent, and Tithes.
All you need is a few white T-shirts, paintbrushes and a
black sharpies... for writing and
fabric paint.
Creating custom t-shirts will help reinforce the importance
of our
Time, Talent, and Tithes.
Note: Plan on spending 2 weeks on this project or spread it out over the entire series. You will only be able to work on one side per week due to drying time.
If you are looking for lessons for this type of series, consider using the following
Barnabas (Missionary), The poor woman's gift, Parable of the Talents
On a budget? Ask each child to
bring an old white t-shirt from
home. They will work just as well!


The Lost Sheep
Craft + The Lost Sheep Game


Double the fun with this precious lamb craft plus
Lost Sheep Game!
Simply trace out the template, cut it out, paste it together, and add google eyes! (PDF Below)
Baaa...How many lambs can you find? Send your kids on a scavenger hunt to find all 100 lambs.
When they find a lamb, they simply stick it on the chart and say Baaaaa!
How many will they find?
Prior to Class
Create a large chart (bulletin board paper) with exactly 100 squares (Similar to a calendar without the dates).
Cut out the numbered lambs (PDF below) and hide (tape) them around the room.
(Note, If you want a permanent "Lost lamb game" that you can pull out and play anytime, glue each lambs to an index card.
You can also laminate the cards.)
During Class
Children will search for the sheep. When they find one, they will stick it on one of the squares (any square will do) and say BAAA...then they will continue to search for the rest of the lost lambs.
Hint: Hide a few harder ones so that they have to search high and low for them.
I have been known to hold out #100 and secretly stick it somewhere after they have searched and searched for it.
Hint: Always have a couple extra lambs in your pocket in case they cannot find all 100 (this is inevitable.)
Needing an easier lamb craft for the pre-schoolers? Check out this cotton ball lamb craft!
Jesus is my ROCK
David V Goliath


Jesus is my rock! David V Goliath - Craft, Lesson, and Game!
Turn something as simple as a rock into a great teaching moment.
Give each child a large rock plus 5 small flat smooth rocks, some paint, a few odds and ends...and of course, googly eyes, and let their imaginations run wild!
Do you know what the 5 smooth rocks are for? Of course, they will be used while teaching about David and Goliath and will ultimately be used for a David vs. Goliath game.
Add to the fun by reading the David and Goliath poem below! I don't know where the poem came from...I have had it for many years. many years!
End the evening by playing David Vs Goliath rock game using stones you have prepared in advance (dry). Send the children's (5) stones home with them once they have dried. Purchase or make small drawstring bags to put each child's 5 smooth rocks into.
David and Goliath (POEM)
Scroll Down for the David and Goliath Craft, Game and Stone Pouch Instructions
David Defeats the Giant
Game and Craft


Your servant has killed both the lion and the bear; this Philistine will be like one of them because he has defied the armies of the living God. 1 Samuel 17:36
Looking for a fun way to teach your children about faith? About trusting God in times of trouble? About how God is BIGGER than anything? Check out this fun craft/game that children can create and play at church or at home!
Children will paint their own stones, make their own pouch in which to store them, create a playing field and play for hours...all while learning about one little boy...who put his trust in God!
Supplies: (Per Child)
6 Smooth, Flat Stones (1 much larger than the other the others- Goliath)
1 long piece of yarn to make a large circle on the floor. You may choose to use masking tape instead of the yarn. Either one if fine!
1 black permanent marker
Paint (acrylic, tempera, poster paint, or permanent markers) 6 Colors.
Paint Brushes (1 per child)
Paper Plate to pour out small blobs of paint onto.
Bowls of water to wash paint brushes
Paper towels to dry brushes after washing
Supplies: Pouch for stones (Optional)
1 Piece of scrap fabric
2 Different colors of yarn (regular weight)
1 needle with a large eye...large enough for the piece of yarn to go through the eye. (or a hole punch that will punch through the fabric)
Rocks
Children will paint each of their rocks a different color.
When the paint dries, the children will use the black marker to write "Goliath" on the larger rock.
They will place a "D" on one of the smaller rocks. Followed by an "A" on the second, "V" on the third, "I" on the forth and finally a "D" on the last rock. Spelling out the name D-A-V-I-D.
Make sure the paint is completely dry before the play begins.
While the stones are drying, consider creating a fun pouch for the stones.
Children can stop at this point and play their game or they can create a pouch for their stones to go into. (Instructions below)
David and Goliath Game
Instructions:
1. Using a long piece of yarn, tie the two ends together and create a huge circle on the floor. Or use painters tape to create a rectangle/square/circle. Make sure that the rocks will slide well on the floor that you have chosen.
2. Place the Goliath stone in the center of the playing area (The large stone)
3. Players will take turns sliding their David stone across the playing field and attempting to knock Goliath out of the circle.
Rocks are to be SLID across the floor not thrown.
1-5 Players
Stone Pouch
While the stones are drying, consider creating a fun pouch for the stones.
Supplies
1 Piece of scrap fabric
2 Different colors of yarn (regular weight)
1 needle with a large eye...large enough for the piece of yarn to go through the eye. (or a hole punch that will punch through the fabric)
Note: This craft can also be done by using a hole punch and punching holes around the edge of the fabric. Simply run the strings through the holes and complete craft by following step 4 below.
You can always purchase draw string bags or allow the children to decorate small paper bags to take their rocks home in however, the above (instructions below) method is the one I prefer. It takes a little prep work but it is well worth the effort!
Download Instructions Below


I Spy
Treasure in a Bottle Craft


Supplies:
A water bottle with a lid (1 per child) (There are some really neat salad dressing bottles that look like treasure bottles (Bitten or Walden Brand). If you can find bottles that have long necks...such as the pictures above or the Salad Dressing bottles...use them!
Funnels (to fill bottles with birdseed) Test your funnel once you have purchased your seed to make sure that the opening is large enough for your seeds to pass through easily.
A piece of hemp, string, or yarn. Approx. 12” Long with small knots at each end (1 per child)
A bag of birdseed or rice
20 trinket items (clean out your leftover craft items) Buttons, screws, pennies. toothpicks, paper clips, beads, etc. whatever you can find. (20 items per child)
A "Treasure in a Bottle" poem with a hole punched in the upper left-hand corner. Add a hole reinforcement to the back of the tag (round white hole reinforcements). The bottle will be used a lot and the reinforcements will ensure that the tag remains intact.
(1 Per Child).
A 4X4 piece of netting (optional)
Instructions:
Allow each child to:
1. Fill their bottle (halfway) with birdseed
2. Drop the 20 trinkets inside
3. Put the lid on top and shake the bottle
4. Re-open the bottle and finish filling the bottle with birdseed. Leave a 3” gap, depending on your particular type of bottle, between the birdseed and the top of the bottle
5. Screw on the lid
6. If you are using netting, have them center the netting on top of the bottle lid and pull it down around the neck of the bottle.
7. Place a piece of braided yarn around the netting and the neck of the bottle and tie one knot
8. Run one end of the yarn through the hole on the poem gather the two ends of the string together and tie into a knot.
You can use this craft for any lesson involving the ocean, water, treasure, etc.
I have used it when teaching on Paul's Shipwreck.
For the lesson about Rahab. I simply left off the netting and hemp and I replaced it with 3 strands of red yarn braided together to represent the scarlet rope. We talked about the men escaping and how they were "hunted" for...but not found.
I have also used it when teaching on the "Spying Out Canaan"


Creation Coloring Book With Scripture
Designed with the preschooler or younger child in mind.
Perfect for a 6 week series on creation.
We used the coloring book on day 6, the creation of man. Throughout the series, I took photos of each child. The last week, I took copies of the photos (one of each child), a tape measure tape (which I hung on the wall), and my bathroom scales. If I had a visitor on the last day, I allowed them to draw a picture of themselves on the photo page.


%20(1).jpg)

Traveling Jesus
Traveling Jesus! Take Jesus with you wherever you go! Share Jesus with others!
It's summertime, and many families will be traveling, going on vacation, going on outings, having picnics, etc.
Reinforce the message that Jesus is with them wherever they go!
Have a little fun with your children by having them create and take a "Traveling Jesus Puppet" with them wherever they travel this summer. Children will pack their Jesus puppet and take pics with Him wherever they go. Near...or far!
Traveling Jesus can be pictured with the family, child, or by himself in unique places.
If you choose, have your families take and text pics to you. Make sure they include their location. Post them on your church social media or save them until the end of summer, then create a special slideshow of all the fun places they traveled this Summer and teach them that Jesus is with them...always.
Encourage your families to think of fun ways to share Jesus with others while on their travels:
Use your traveling Jesus to open a conversation about Jesus.
Ask "new friends" if you can take their pics with your traveling Jesus. Make sure to ask for their names (first name is fine) and tell them you will be praying for them on their travels.
Create more than one "traveling Jesus" and pass them out...making sure to put contact information on the back so they can share their pics with your church as well.
Ask them to include their name (first name is fine) and where traveling Jesus is in the picture)
Where will Jesus travel this summer?


It's Summer Time and many families will be traveling on vacation, outings, picnics, etc.
Don't let them travel along...Pass out Traveling Jesus puppet sheets to each child and let the fun begin.
Where will Jesus travel this summer??
INSTRUCTIONS:
1. Color your Traveling Jesus.
2. Glue your Traveling Jesus to a thin piece of cardboard
3. When dry, cut out and glue to a popsicle stick (Puppet handle)
5. Take Traveling Jesus with you wherever you go this summer:
on vacation, the park, the zoo, the beach, etc.
6. Have someone snap a picture of your "Traveling Jesus" alone, with you, or with a family member.
7. Challenge: tell at least one person that Jesus loves them and take a picture of your traveling Jesus along with yourself and your new friend.
8. Text your pic to your children's leader with a description of where you are.
9. As a family, discuss ways you can share Jesus with others.
Remember to take Jesus with you wherever you go...on vacation, to the park, to the zoo, to the grocery store...or wherever else you travel this summer!
Share the pics at the end of each week, month, or at the end of summer. You can share them on your church's Facebook page, a bulletin board, an announcement screen, etc (however you choose to share your pics.
Pool Noodle Sabers
Simple Craft and Game Time!
Here's a REALLY FUN craft that would be great for any battle in the Bible!
David and Goliath, Saul and David, Gideon battles the Midianites, or any other battle or conflict.
Just grab a few pool noodles, cut them to your preferred length, supply rolls of brightly colored duct tape for customization, and let the fun begin.
If you choose, you can wedge a small flashlight or glowstick into the handle area. Do not place it on the tip end, as someone will get hurt.
My biggest rule is...no hitting in the head, face, or any area that would be inappropriate. Plus, no hard hitting or they receive a timeout after ONE warning only! Repeat offenders have to sit out. I make the rules clear upfront, and they know that I mean what I say...so there are no surprises!


Shine Your Light!
Bubble Wand Light Sabers!
Grab some bubble wands (empty or full), duct tape (fun colors), and some glow-in-the-dark sticks and create these fun Bubble Wand Light Sabers! Simply decorate your wand with colorful duct tape, crack a couple of glow sticks, and place them inside the wand, and you're ready to go!
Turn off the lights and let your light shine! This is a good time to sing the old song..."This Little Light of Mine" with the lights off and wands waving in the air.
Perfect craft for teaching children how to share Christ with others...by simply shining for Christ!


Duct Tape Creations
Sticking with Jesus!
Grab your duct tape and allow the children to get busy creating! Have a few samples of the items they can make but allow them to be creative on the colors, designs, etc.
Make bookmarks by sticking two pieces of duct tape back to back, punching a hole in the top, and attaching a ribbon and beads.
Duct tape bracelets are made by folding a piece of duct tape together (longways), attaching a velcro square on each end (opposite sides of the velcro). Shapes can be added to the bracelet by simply cutting out various pieces/shapes of colorful duct tape to add style and texture.
A wallet can be made by creating a 7″x9″ double-sided sheet of duct tape. To do this, overlap strips of duct tape until you have a 7″ x 9″ sheet. Repeat...making a second sheet. Then stick the sheets back to back with the sticky sides facing each other. Cut off any excess tape. You will end up with a two-sided 7"X9" piece of duct tape.
Fold the sheet horizontally and then put a coordinating colored strip of duct tape along the outer edges. Be sure to leave the top open, because that’s where you put your dollar bills. Your creation should now look like an open wallet. Close the wallet.
You can add a pocket to the front and back of your wallet by using a double-sided piece of duct tape in the color of your choice. The pocket should measure
2.5″ x 4″. Tape around the edges of the pocket (leaving the top open).
Voila you have a wallet!
Purses can be made by making 2 two-sided sheets of duct tape (as above) and then taping the 2 two-sided sheets together. A strap can also be make by out of duct tape!


Candy Canes
Ever wonder what to do with all of those leftover candy canes?
Here are three great...and delicious ideas! Note: Try using the different colored canes as well.
-
Using a coffee grinder, break the candy canes into small pieces and grind them into a powder. Perfect additive for your hot chocolate or coffee.
-
Using a meat mallet, place your candy canes into a large ziplock and give it a few good wacks. Being careful not to bust the bag. Break into small pieces...but not powder. Using a parchment paper-lined cookie sheet, place the crushed candy canes into small piles on a parchment paper-lined cookie sheet. Place the stacks close together so that when they melt, they will run into each other. You may use different colors of candy canes if you desire. Place the different colors into small stacks and allow the stacks to melt and run into each other...giving a stained glass look. Bake the candy cane pieces at (250-300 degrees) until they have all melted and made one large sheet of candy. Be careful, the candy will be HOT. Cool and then break into small candy cupcake toppers. As the candy canes begin to cool, you can lift and curl the edges to give your toppers a curved appeal.
-
Crush the candy canes into small pieces and put them inside your cupcake batter.
-
Try using the different colors of candy canes and create stained glass candy. Just put small piles of the different colors next to each other and let them melt together.


Walk A Little Slower, Daddy - Footprint Scroll
Needing an easy, inexpensive, and memorable Father's Day Craft? Here's a great one!


Game Night
Giant Game Board and Die
Are you thinking of hosting a board game night? Consider creating your own giant board game with carpet squares for the spaces and a massive die made from a (square) cardboard box.
For the Die:
Simply wrap the box with white paper, attach circles made from black paper, and wrap the entire box with packaging tape or clear contact paper. (This will make it last longer.)
For the Numbered Carpet Squares:
Check with local carpet dealers in your area, carpet squares can normally be picked up for FREE!
If you want to keep the carpet squares for future play, look for something permanent to write the numbers on the squares. You can use large stencils and spray paint the numbers on, cut out sticky vinyl numbers, print the numbers on printer paper, and cover completely with clean packaging tape, etc.
For the Squares:
For the Start, "Finish, Go back one Space, etc squares. Print out the instructions onto computer paper and cover the page entirely with packaging tape (Go overboard on the tape so that it stays adhered to the square).
Remember to create some squares that complement your lesson. For instance, you could make one square read "Skip a Turn...Red Sea Ahead" to coordinate with a lesson on Moses' parting of the Red Sea.


Christmas Paint and Praise Party

For More Information on a Paint and Praise Party, Click the link below. https://www.steppingoutministry.com/pizza-paint-and-praise-night
Hosting a Let's "Taco" bout event?
Here are a few ideas for you to consider adding to your event...
Taco bar, walking tacos, pinata, divide into teams and have a dress-up relay with Pancho or sarape, sombrero, skirt, etc. Sombrero Toss...toss over a (cutout) cactus.
Get creative!
FREE LOGO PDF Downloads Below!


Do It Yourself Cookie Kits
.jpg)
Looking for another unique porch drop or hand out?
Check this out!
Do It Yourself Cookie Kits. Cookie Kits can be dropped off for any holiday.
Drop cookies, promote family fun time, challenge families to a Facebook competition.
Create nativity shapes for the Christmas season with scripture references for parents to read and families to discuss as they decorate their cookies.
Chocolate or White - Which Will You Choose?
Cake Mix Object Lesson
CHOCOLATE OR WHITE...WHICH WILL YOU CHOOSE?
For this object lesson, you will need
1 box of dry chocolate cake mix (Use gluten-free cake mix if you have gluten-free children)
1 egg
Oil - Per Box Instructions
Water- Per Box Instructions
(The cake used for the first part of this object lesson will not be baked or consumed.
It is to be discarded after class)
The second half of the object lesson uses a pre-baked and cooled cake. 1 pre-baked chocolate cake.
Bake per box instructions. (cooled)
1 Container of white frosting mix
Sprinkles
The pre-baked cake will be consumed during class.
Download the FREE Object Lesson Below.


Christmas Angel
Paper Chain Countdown to Christmas

Note: The image has been cropped. Wings are actually rounded.
Paperchain will be stapled to the bottom edge of the angel.
-
8" White Doiley - cut in half. If you do not have a white doiley, use any paper you choose
-
8" Gold Doiley - cut in fourths. If you do not have a gold doiley, use any paper you choose. I have used gold wrapping paper.
-
Halo (use a 8" piece of gold pipe cleaner, leave a 1" tail. Shape the rest of the pipe cleaner into a circle and twist to hold.) Halo is flat in the sample photo in order to copy it. Halo should stick straight out in the front.
-
Paper Chain - Cut 25 1"X 8" wide paper strips (per child). I use red and green and alternate when assembling. Use fewer paper strips if you start after December 1st.
Before We Begin
-
Gather the following supplies - Blue Construction Paper, White Doiley, Gold Doiley, gold pipe cleaner, computer paper, glue, stapler (with staples), red and green construction paper, scissors. Masking tape, design scissors (if you have a pair) Note: Use a paper cutter to cut the construction paper chain strips (if you have one)
-
Down load all patterns.
-
Cut out all patterns.
-
Cut Doiley's.
-
Create a halo using the instructions above.
-
Cut out the paper chain links.
Let's Get Started
-
Tape the tail of the halo to the back of the blue construction piece. Make sure that the round halo is facing away from you. Secure tightly. Use extra tape. If the halo comes off, consider using a drop of hot glue once the project is completely finished.
-
Flip the project over. Halo should now be facing you.
-
Glue the gold wings on.
-
Glue the white gown on. (Note fold both sides (edges) of the gown under slightly and then glue the folded edges down. This will give the gown a full look. Practice first...if you do not like this look then just cut the white doiley a little smaller and glue it flat.
-
Glue the face onto the angel
-
Glue the poem onto the gown
-
Create the paper chain
-
Staple the paper chain to the bottom edge of the angel.
Option: I have attached a download for the 25 paper chain links below. Each link has a different scripture reference. Download, print, and cut one set per child. Use plain white paper...or get festive and use alternate red and green pages.

Jesus is Born Craft
Super simple craft...but it says it ALL!
Using 5 popsicle sticks, create a manger shape/design and glue them to a sheet of construction paper or card stock.
To create baby Jesus:
Create a swaddling out of a small piece of burlap (or white cloth) and glue it to the center of the manger.
Glue a cotton ball down for the head.
Place two drops of paint onto the cotton ball for the eyes.
Glue the baby Jesus onto the paper/card stock.
Using a small piece of pipe cleaner, make a loop, twist, and leave a tail.
Stick the tail of the pipe cleaner behind the cotton ball, glue securely, and then bend the pipe cleaner forward.
Add a few foam/sticky stars or allow the children to draw their own.
Write a scripture or "Jesus is Born" to your craft, and share with the world that Jesus is Born!
Allow plenty of time for your craft to dry, or use hot glue to attach the popsicle sticks and baby Jesus to the page.

Complaining People
Teaching about complaining people, the tongue, the mouth, or the words we speak?
This fun, yet simple, craft will help drive home the message that our tongues, although small, can create some VERY BIG problems!
Run copies (card stock or stiff paper is best) of both the girl and boy craft sheets.
Cut small ½” pieces of several different colors of yarn. (red, yellow, white, black, brown) to be used as hair.
Collect the following: Lipstick (1 or 2 tubes), Q-Tips (to apply lipstick with), Wet ones (to wipe faces), glue
Instructions:
Apply lipstick to each child’s lips (use a Q-Tip for sanitary purposes).
Allow the children to press their lips onto their own picture, forming a mouth for their craft.
If a child does not want to wear lipstick, allow them to draw a mouth on their picture with a marker.
Allow each child to choose the color of yarn they want for their picture, and have them glue their yarn (hair) onto their craft.
Allow time for the craft to dry.
Object Lesson
This is a great time to toss in the toothpaste object lesson.
Have a child or several children take turns squirting out an entire tube of toothpaste onto a paper plate.
Then ask for volunteers to put the toothpaste back in the tube.
Object: Once we have said something nasty or mean, we cannot take it back, so be careful with our words!


Jelly Bean Guessing
Game
and Outreach
Competition
Easter is the perfect time for a little friendly competition? Purchase, find, or borrow a 1-gallon mason jar with a lid (a 1-gallon pickle jar will work just fine). Fill the jar with jelly beans (hint...you can place something in the center of the jar to take up space and throw off their guesses...just make sure that you can't see the item from outside or through the bottom of the jar. If you choose to add an item, make sure to slip that item inside a gallon zip-lock bag so that the jelly beans do not get dirty). Set out slips of paper and pencils and allow everyone to guess how many jelly beans are in the jar. (1 guess per visit...encourages them to attend...which is a bonus).
Outreach
You can easily turn this activity into an outreach event by posting your competition on Facebook. Open your competition to the community and allow everyone to place their guesses on your Facebook page. Allow one guess per week. If you reveal your winner before Easter, make sure to thank everyone and invite them to your Easter services, programs, and activities.

.jpg)

Good Friday Object Lesson
New Lesson and Games added to download
Add this simple object lesson to your Good Friday teaching plan.
What you will need
-
Black Sharpie
-
Large red marker
That's It! How much easier can it get?
Turn Christ's amazing sacrifice into a memorable teaching moment by recreating the nail marks on each child's hand.
Send the children home with the knowledge that "Christ died for THEM!"

Witnessing Tools (Wrench) - Children's Witnessing Tool


-
Duplicate the wrench templates onto cardstock - Black, Red, White, Blue, Green, and Yellow.
-
Have the children cut out 6 wrench shapes (one of each color).
-
Have the children cut out the definitions for each wrench and glue them onto the correct wrench.
-
When dry, have the children stack one wrench on top of another, and punch a hole in the top of the wrench for a key ring.
-
Using a binder ring, run the ring through the hole on the wrenches and close.
-
Attach a strip of leather, ribbon, string, etc., to the binder ring and secure. Leaving a tail on both ends of the string.
-
Place a black, red, and white bony bead on one end of the string and tie a knot
Place a blue, green, and yellow bead through the second end and tie a knot.
Keys to Heaven - Children's Witnessing Tool


-
Duplicate the key templates onto cardstock - Black, Red, White, Blue, Green, and Yellow.
-
Have the children cut out 6 key shapes (one of each color).
-
Have the children cut out the definitions for each key and glue them onto the correct wrench.
-
When dry, have the children stack one key on top of another, and punch a hole in the top of the key for a key ring.
-
Using a binder ring, run the ring through the hole on the keys and close.
-
Attach a strip of leather, ribbon, string, etc., to the binder ring and secure. Leaving a tail on both ends of the string.
-
Place a black, red, and white bony bead on one end of the string and tie a knot
Place a blue, green, and yellow bead through the second end and tie a knot.
Seeing the Good in Others - Object Lesson + Free Lesson Jesus Teaches the People - Judging Others/Prejudice
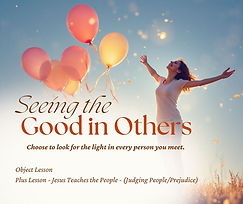
For this object lesson, you will need:
One inflated balloon per child. All balloons should be the same color.
One piece of cardstock per child. Punch a hole in the top center of each cardstock before class begins.
Black sharpies...one per child.
Large trash bags to put the balloons in.
Give each child a balloon.
Instruct the children to secretly draw a picture of themselves on the balloon.
When they finish the picture, secretly place it in a large trash bag.
Continue to collect all balloons and place them in the large trash bag(s).
After all balloons have been gathered, seat the children in a large circle, pull out one balloon at a time,
and let the children guess who the picture is of.
As they guess, lay the balloon in front of the correct child.
When all the balloons have been passed out, give each child a piece of card stock.
Instruct the children to thread the end of their balloon through the hole and tape it on the bottom side to secure.
Have the child write their name on the card stock.
Each child will now go around the circle and write something POSITIVE, NICE about each person on their card stock.
Teach the children that we are to look for the good in a person, not the bad.
We are not to judge. We are each individual people. God has created each of us unique and special.
We are to be concerned with our inside, not our outside. If someone judges you by outward appearances,
we are to remember that God judges from the inside out.
If someone passes judgment on you by commenting on your outward appearance, do not reply with a comment.
This will make your inside ugly, just like their comment is.
Cord of Three Strands Object Lesson:
God puts other Christians in our lives to keep us strong.

OBJECT LESSON
You will need 3 strands of rope or string. Each strand should be light enough so that a child can easily break one strand, but thick enough that breaking three strands is very difficult.
Allow the children to break one strand.
Then add a second strand, and then a third, and allow them to practice breaking the strand.
Discuss how we need each other as Christians and how God puts other Christians in our lives to keep us strong.
Tip: Use my
and my “A Hand to Hold” post to expand your lesson even more....
Here’s a snippet!
Every night, before going to bed, sea otters do two things. They find a seaweed or kelp forest to bed in, and they find their mate’s paw. As they fall asleep, they clasp their paws together. And why? To keep from drifting apart in the night.
Tides and currents will separate them from one another...but by entangling themselves in seaweed, and holding their little paws together, they can drift the open seas together.
You can find the entire post on my blog at https://www.steppingoutministry.com/blog
Tossing Away Our Sins - Game
Lesson - Samson

TOSSING AWAY OUR SINS- GAME
Need
Scrap sheets of 8 ½ X 11 Paper
Markers, pens or pencils
Masking Tape
What you will do:
In this game, the paper balls represent sin, and the kids will pretend to throw sins away. However, as they throw them away, the kids on the other side of the room are throwing more back. Each team will throw the balls (sins) to the opposite side and keep throwing any that come back. After about 30 seconds of throwing, the team that has the fewest number of balls on their side will be the winner. Then switch the teams around and play again.
Preparation:
Mark the center of the floor with masking tape to separate each team.
Give each child a piece of paper. Ask them to write down a sin on their paper. Explain that anything we do that is displeasing to God is sin.
When we treat others unkindly, that is a sin. When we worship other gods instead of the one true God, that is a sin.
Today, we are going to do just the opposite. We are going to throw our sins away.
Divide the children into two teams, and have them stand at opposite sides of the room.
When teams have been selected, say:
When we throw away God’s teachings and decide to do things our way, this is called sin.
Each of you has a sheet of paper that we have passed out. Wad up that piece of paper, and then we need to divide into two teams.
Have one team stand on one side of the divided line and the other team on the opposite side of the line.
What will you say:
When we accept Jesus into our lives, He gives us the strength and help we need to get rid of all our sins. Have the children crumple up their piece of paper into a ball.
However, being a Christian does not mean we are completely free of sins. Sometimes there are temptations, such as envy, anger, disobedience, jealousy, gossip...and a whole lot more.
When we are tempted with these sins, we need to be aware, and when they come our way, we need to throw them away.
Let the fun begin: Each team will throw the balls (sins) to the opposite side and keep throwing any that come back. The goal is not to hit one another...the goal is to toss sin away. After about 30 seconds of throwing, the team that has the fewest number of balls on their side will be the winner. Then switch the teams around and play again.
PDF DOWNLOAD INCLUDES LESSON (SAMSON), COLORING PAGE, WORD SEARCH, AND THE "TOSSING AWAY OUR SINS" GAME. YOU CAN USE THE GAME AS A STAND ALONE GAME IF YOU CHOOSE.
Lies - Object Lesson, Games and Lesson on Adam and Eve
A Children’s Bible object lesson can bring Bible truth to life in everyday life. Combined with Scripture, they can impact children for the Kingdom of God.

Use this simple children’s Bible object lesson to teach a powerful Bible lesson on confessing sin and receiving God’s forgiveness.
For this lesson, you will need: White board, white board marker, an eraser.
Write a sentence on the board. Misspell one simple word in the sentence that everyone will notice easily. Begin talking about a subject and allow time for the children to spot the misspelled word.
When someone does notice it
-
Pretend you do not see it
-
Argue that it is right
-
Have someone look it up in the dictionary
-
Say “Well, that’s just the way I want to spell it. (Let them argue the point)
-
Admit it is wrong but cover it up with your hand or a piece of paper.
-
Finally, ask them what they want you to do about it. Hopefully, they will say “Eraser it or write it correctly.
Explain that these are the same ways people treat sin in their lives:
-
First, we pretend we do not see it.
-
Second, we argue that it is correct.
-
Third, we decide we do not care what the rules say: we are going to do it our way anyway.
-
Fourth, we agree that it is wrong, but just try to cover it up.
God, however, wants to erase our mistakes for us.
But first, we must see that sin is wrong, agree with God that it’s wrong, turn away from it to make it right, and ask God to forgive us or erase it.
1 John 1:9 declares: If we confess our sins, He is faithful and just and will forgive us our sins and purify us from all unrighteousness.
Click below to download this Object Lesson
PLUS
My FREE lesson on Adam and Eve (Lies) as well as 2 Free Games
I Get Down, He Lifts Me Up - Dancing/Floating Stick Man - Object Lesson

You will Need:
A GLASS PIE PAN OR PLATE
(FLAT BOTTOM)
A EXPO DRY ERASER MARKER
A GLASS OF WARM WATER
Using a EXPO DRY ERASER MARKER, draw a "small" stick figure. Make sure the lines are solid and the circle is connected.
Allow the ink to dry for a few seconds. (5-10)
Very slowly, pour the warm water into the pie pan.
The stick figure will release from the bottom of the pan and float on top of the water.
If your stick figure breaks apart, you are pouring the water too quickly, the figure was not connected well, or the water is not warm.
Optional: For added fun...after your dancing figure rises to the top of the water, practice gently laying your hand on top of the stick figure. If done correctly, the stick figure will stick to the palm of your hand. This part requires a little practice in advance. Say "How faithful is our God who lifts us up in times of trial."
TIPS:
-
USE WARM WATER
-
POUR WATER VERY SLOWLY.
-
DO NOT POUR THE WATER DIRECTLY ON TOP
OF THE STICK FIGURE.
-
YOU ONLY NEED A LITTLE WARM WATER. ENOUGH FOR THE FIGURE TO RELEASE AND DANCE FREELY FROM THE PAN.
-
ONCE YOUR STICK FIGURE FLOATS, YOU CAN SLOWLY TIP THE PAN FROM SIDE TO SIDE TO MAKE IT DANCE.
-
THIS TAKES A LITTLE PRACTICE, SO GIVE IT A TRY BEFORE TRYING IN CLASS. TRY DIFFERENT PANS TO SEE WHICH ONE WORKS BEST.
Napkin Talk - Sharing the Plan of Salvation

Sharing Jesus one napkin at a time! A simple way for children to draw and share the Plan of Salvation during mealtime conversations with friends and family.
Grab a napkin, and share God's amazing love. It's that easy! Perfect for lunchtime, snack time, or anytime kids want to share their faith in a fun, creative way.
Equip your children with the necessary tools to share the Plan of Salvation.
All they need is a napkin, a pen/pencil, and an opportunity to share.
What could be easier?
Grab a handful of napkins and get started.
-
Run through the technique during class time (several times).
-
Pair the children up and allow them to practice with one another.
-
Encourage parents to engage their children in practice while eating out.
-
Encourage parents to engage their children in practice at the dinner table, during snack time, etc. (Bonus...this practice will also teach parents to share their faith with others.)
-
Practice with friends...grandparents, siblings, etc.
Before too long, the children will possess a solid understanding and the ability to share their faith with others with confidence...and a BOLDNESS to share!
Sharing Jesus one napkin at a time! A simple way for children to draw and share the Plan of Salvation during mealtime conversations with friends and family.
Draw a circle in the right upper-hand corner of the napkin.
This circle represents heaven.
Share these three simple facts about Heaven:
a. Heaven is a perfect place.
b. There is no sin in heaven.
c. God lives in heaven.
Draw a circle in the bottom left-hand corner of the napkin.
This circle represents the Earth.
Share these three simple facts about Earth:
a. Earth is a sinful place.
b. WE ALL live on Earth.
c. The Bible tells us that ALL have sinned and fall short of the glory of God.
Draw a huge cloud between heaven and Earth. This cloud represents sin. Make sure the cloud runs from the top to the bottom of the napkin.
Share these 3 simple facts.
a. Sin separates us from God (Heaven).
b. We cannot go through, under, over, or around sin to get to God (Heaven).
c. As long as we have sin in our hearts...we will be separated from God forever.
But here’s the good news!
Draw a big heart around the Earth
a. Because God loves us so much, He doesn’t want us to be separated from Him forever.
b. So God created a way for our sins to be forgiven...erased...wiped away forever.
c. That way is through His son Jesus Christ
Because God loves us so much...
Draw a cross on the Earth.
Share these 3 simple facts.
a. God sent His one and only Son, Jesus Christ, from Heaven to Earth.
(Draw an arrow from Heaven to Earth)
b. Jesus was sinless.
c. Jesus paid the price for our sins...He took our punishment.
When Jesus died on the cross...
Share these 3 simple facts.
a. His blood covered our sins.
b. Jesus paid the price for our past, present, and even our future sins.
b. There is no other way to Heaven except through Jesus Christ.
But that’s not all of the story:
Share these 3 simple facts
a. By dying on the cross, Jesus offers us a FREE gift. The gift of Salvation.
b. To accept the gift, we must reach out and receive it.
c. We must ask Jesus to forgive us of our sins and to take them away.
How do we accept Jesus’ FREE gift?
Share these 3 simple facts.
a. We must admit we are a sinners.
b. We must ask Jesus to forgive us of our sins.
c. We must ask Jesus to come into our hearts and be our Lord and Savior.
And when we pray for forgiveness...
Our sins will be forgiven.
Fold the napkin over so that the sin cloud is covered.
And then when we die...we will be allowed into heaven.
Draw an arrow from Earth to Heaven!
Stick With Me - Laminin - Object Lesson

For this object lesson, you will need a piece of paper and a pair of scissors.
As you talk, VERY slowly fold and cut the cross.
It only takes a few seconds to fold, and you do not want the focus on your hands...you want the focus on what you are saying.
In 2 Corinthians 4:10
We find this “We always carry around in our body the death of Jesus, so that the life of Jesus may also be revealed in our body.
How in the world can we carry the death
of Jesus in our bodies?
Our bodies are a miraculous thing. In fact, God made us in His own image. And anything that is made in the image of God must be incredible!
But how can we carry around the death of Jesus in our body?
Here’s how...There is a protein in our body called laminin.
When we view protein laminin under a microscope...what do you think we find?
Take some guesses.
A cross...the protein laminin is shaped like a cross…so the death of Jesus…the cross can
be seen in our bodies.
Now here’s where it gets even more fun!
In Colossians 1:17 we read this:
“He is before all things, and in him all things hold together...Jesus holds all things together.”
What do you think the purpose of the laminin protein is?
You guessed it...the laminin protein holds our bodies together!
… its job is to hold everything together.
Isn’t God amazing?
Molecular biologists call laminin the “glue” that holds the body together.
Without Jesus and what He did for us on the cross, our lives would fall apart.
Jesus is the one who holds our lives together, just like laminin holds our bodies together.
And we CAN see proof of the death of Jesus in our bodies by looking at the protein that each of us carries in our bodies.
The cross! (Hold up the cross)
Reaching Our Full Potential - Object Lesson - Apple

For this object lesson, You will need two bright, red, shiny apples.
Optional: You may choose to bring an apple core, a rotten apple, apple seeds, or an apple in any stage of life...mentioned
in the object lesson.
Today, I have a bright, shiny, perfect little apple to show you.
Looks delicious, doesn’t it?
I don’t see a single blemish on this little apple.
Once, this little apple clung tightly to the branch of an apple tree with many other apples.
Every time the wind blew, it hung on just as hard as it could. It didn’t want to fall on the ground because it was
dusty and dirty below. There were rotten apples and worms and creepy crawly bugs of all kinds on the ground.
Nope, he thought...that is not the life for me!
A second apple noticed how hard the first little apple was clinging to the tree. He chuckled and said,
“Looks like you’re holding on to that branch for dear life, little buddy.”
“I am”, he replied. “I don’t want to fall.” “I plan on being hand-picked by a special family, taken to their home, and placed
into a beautiful fruit bowl. With my shiny red skin, I shall be the most delicious-looking piece of fruit in the entire bowl!”
The second apple gently replied, “There is much more to being an apple than just having shiny red skin.”
“Yes, I know!” the little apple quickly interrupted, “One of the children will probably take me to school for lunch, or perhaps have me
for a snack after school. They will know that I was more than just a beautiful apple with a shiny red peel, they will find out
that my fruit is great tasting and healthy for them.”
“Yes, yes, you could be all those things for a season,” the second apple tried to reply.
But once again, the little apple broke in, “Why, after they’ve finished eating the fruit, and all that is left is my core, they will… they will...,“
the little apple's voice dropped, “They will probably throw my core in the trash.”
“Yes,” replied the second apple, “That is what your life could be like if you decide to live for the moment and choose
to reap the quick rewards.”
“Whatever do you mean?” asked the little apple,
The second apple spoke, “I have been trying to tell you, if you’d just slow down for a moment and listen.”
“Well, please hurry. The wind is picking up again.” the little apple said nervously.
Slowly, the second apple began to explain. “When the winds come, you may be shaken from the tree and fall to the ground.
It is then that your shiny red skin will keep you from splitting apart and becoming applesauce.
Once on the ground, a hungry bird or squirrel may find you and carry you away from the base of the tree. Once you’ve met
their needs and filled their stomachs, they shall leave your core and a little fruit behind. It is then that your real work begins.”
“That doesn’t sound a bit better," the little apple screeched, "in fact, it sounds worse!”
“Please allow me to finish,” the second apple said sternly, ”Once you’re left on the ground, the rest of your fruit shall slowly
rot and blend into the ground. It is at this point your seeds shall be buried in the earth. For a period of time, the seeds will remain in the ground. But then ever so slowly something wonderful begins to happen.
The seeds begin to sprout, breaking through the dirt. The sunlight and the rain help the sprout to grow into a small tree.
Within a few seasons, the tree shall grow big enough to start producing apples of its own.
From that season on, the tree will produce hundreds of apples each season. So you see, little apple, there is so much more you
can be.”
All the little apple could say was, “Wow!”
As the winds picked up, you could see both apples swinging in the breeze, hoping beyond hope to fall to the ground
and begin their life’s work.
Weeeee...said the little apple!
Weeee...said the second apple!
As they gently swung in the breeze. And together...they turned loose and fell to the ground...ready to start their new life’s work!
Our lives can be very much like the apples. We could choose to live for the moment, to fulfill our own plans and desires.
Although the plans we have for our lives may be good, God’s plan is always better.
If we take our time, be patient, and listen to what God is softly telling us. He will lead our paths.
For I know the plans I have for you,” declares the Lord, “plans to prosper you and not to harm you,
plans to give you hope and a future. Jeremiah 29:11
We can surround ourselves with many “things” to make us comfortable, but in the end, these things only last for a season.
Or, we could use the time, talent, and money God gave us for His purpose and glory. It is only then that we can reach our full potential.
From Creation to Salvation - Object Lesson

This story is not copyrighted. Please feel free to spread it as you wish, as long as no profit is made.
This story is a gift from God. Please use it to win souls for the Lord.
Duplicate the playing cards onto cardstock. 5X7 is a great size.
Add the correct stickers to the back of each card. (This will allow you to do the object lesson without reading from a sheet of paper.)
Laminate your cards so that they will last a long time.
To make your object lesson more impactful, practice beforehand so you can glance at the back of the card instead of reading straight from it. The more you practice, the better your object lesson will be.
Feel free to make modifications that make it flow easier for you, but keep to the basic story.
There are many options to choose from.
Note: You can use a plain set of playing cards if you can memorize everything.
You can stand in front with the cards and have a second person read the lines off to the side. Make sure you practice together several times before performing.
Another option would be to attach the plain playing cards to a 5X7 index card and attach/write the words on the back.
Or search for “giant playing cards” online and simply add the verses to the back of each card.
They are relatively cheap, and there are a lot of options.
Choose whichever option fits your needs...and your budget.
Labels (Copy and attach to the back of each card.
In the beginning, GOD created the heaven and the earth and all living creatures. Genesis 1:1 (#1 Ace of Spades)
Each was crea-EIGHT-ed according to his own kind. Genesis 1:24 (#2 - 8 of Diamonds)
He completed everything in SIX days. Genesis 1:31. (#3 - 6 of Clubs)
and on the SEVENTH, He made a day of rest for all. Genesis 2:1 (#4 - Seven of Diamonds)
God made MALE Genesis 1:27 (#5 - Jack of Spades)
And FEMALE in His own image. Genesis 1:27 (#6 - Queen of Spades)
He created the Garden of Eden, which was a PAIR-a dise. Genesis 2:8 (#7 - 2 of Diamonds)
Now God said that Adam and Eve could eat of any tree in the garden. There may have been THREE...(#8 - 3 of Clubs)
Or NINE...(#9 - 9 of Clubs)
Or even TEN trees...I’m not really sure. (#10 - 10 of Diamonds)
Adam and Eve were allowed to eat from any tree...except for one. And that was the tree of The Knowledge of good and evil. For if they EIGHT from that tree, they would surely die. Genesis 2: 16-17 (# 11 - 8 of Clubs)
The Devil...(everyone say Boo!) Genesis 3:1 (#12 - Joker)
came to EVE to tempt her to eat of the fruit, and she did. Genesis 3:6 (#13 - Queen of Clubs)
...as well as ADAM. After they ate of the fruit, mankind’s Genesis 2:17 (#14 - Jack of Clubs)
spiritual oneness with GOD died immediately. Genesis 2:17 (#15 - Ace of Clubs)
Later, God gave Moses the TEN commandments to show us that we could not live a perfect life by our own efforts. We needed a Savior! Ex. 1:8, Ex 20:2-17 (#16 - Ten of Spades)
The first FIVE Commandments deal with our relationship with God (#17 Five of Hearts)
And the last FIVE commandments deal with our relationship with... (#18 - Five of Diamonds)
MANKIND (#19 - Jack of Hearts
So God sent His Son, JESUS CHRIST, to be our Savior. Luke 2:11 (#20 - King of Diamonds)
He was born to a virgin named MARY. Luke 1:27 (#21 - Queen of Hearts)
Now, Jesus performed many miracles. Once he fed over FIVE thousand people...(#22 - 5 of Clubs)
....with just FIVE loaves of bread. (club sandwiches, I am sure.) Matt 14:17-19 (#23 - 5 of Spades)
And TWO small fish. Matt 14:17-19 (# 24 - 2 of Spades)
Another time, a man who could not walk was carried to Jesus through crowds of EIGHT hundred.
Mark 2:2-12 (#25 - 8 of Hearts)
Or NINE hundred (I don’t know. I wasn’t there.) So they climbed on the roof and tore a hole to let the man down to Jesus.
Mark 2:2-12 (#26 - 9 of Diamond)
FOUR special friends lowered the man through the roof and right to the feet of Jesus. Mark 2:2-12 (#27 - 4 of Spades)
He turned to the man and said, “Take up your bed and walk,” and the man rose up be-FOUR them, glorifying God. Mark 2:11-12(#28 - 4 of Clubs)
Jesus also cleansed TEN Lepers #29 - Ten of Hearts
NINE of them ran off (#30 Nine of Hearts)
And only one remembered to tell GOD “Thank You!” (# 31 Ace of Diamonds)
Later, Jesus said that all TEN Commandments can be summed up in these... Matthew 22:37-40 (#32 - Ace of Clubs)
Love the Lord your God with all your heart, soul, and mind; and TO love your neighbor as yourself. Matthew 22: 37-40 (#33 - 2 of Hearts)
That means to FOUR-give anyone that wrongs us, not just once or twice, but...Matt 18:22 (#34 - 4 of Diamonds)
SEVENTY times...Matt 18:22 (#35 - Seven of Hearts)
SEVEN Matthew 18:22 (#36 Seven of Spades)
Well, you would think everyone would appreci-EIGHT all the teaching and healing Jesus did. But, to show their appreciation, they brutally whipped Him with...Matthew 21:9 (#37 - Eight of Spades)
THIRD-ty (#38 - Three of Hearts)
NINE Lashed, pressed a crown of thorns on His head, and mocked Him. Matt 27:26-31 (#39 - 9 of Spades)
They hung Him on a cross between TWO thieves. Luke 23:32-33 (#40 - Two of clubs)
Now here is the good news: THREE days later, the stone was rolled away by an angel. Matt 28:2-6 (#41 - Three of Spades)
To show that JESUS had risen from the dead. Matt 28:2-6 (#42 - King of Spades)
See, the DEVIL hated mankind so much that he tried to have Gen 3:1-7 (#43 - Joker)
Every MAN and...(#44 - Jack of Diamonds)
Every WOMAN spiritually separated from Gen 3:1-7 (#45 - Queen of Diamonds)
The one and only LOVING GOD, And he really thought he had beaten God by having Jesus crucified. Matthew 27:35
(#46 - Ace of Hearts)
But JESUS’ sacrifice and God raising Him from the dead, showed that we could be made spiritually one with God.
Matt 27:3
(#47 - King of Clubs)
In the Bible...In the Book of John
Chapter SEVEN
(#48 - 7 of Clubs)
Verse THIRD-ty
(#49 - 3 of Diamonds)
SIX Jesus said ‘You will look for me, but you will not find me,’ and ‘Where I am, you cannot come’?”
Jesus went to prepare a place for us in heaven.
(#50 - Six of Diamonds)
And we can live with him FOUR-ever, in heaven if... and only if we accept...Luke 24:46-48 (#51 - 4 of Hearts)
JESUS as King of our Hearts. Matthew 16:24-28 (#52 - King of Hearts)
If you want to learn more about Jesus, remember to read your Bible every day! There are Six-ty (#53 - 6 of Hearts)
Six Books in the Bible...filled with adventure, love, and sacrifice! In fact, it’s the greatest love story ever told! (#54 -6 of Spades)
For God so loved the world that He gave His only begotten Son. For whosoever believes in Him shall not perish...but have everlasting life!
Purchase decks of cards and have your children create their own deck. They can be used to share the message with their family and friends. Download the scriptures, shrink to fit your specific cards, and allow the children to tape the to the back of their cards.
Big, Bad, Bully - Object Lesson

For this object lesson, you need
one piece of paper per child.
This would be a perfect object lesson
for David and Goliath (the big, bad, bully) or many other “Bullying”
lessons from the Bible
Do not let any unwholesome talk
come out of your mouths, but only what
is helpful for building others up
according to their needs, that it
may benefit those who listen.
Hand out a piece of paper to each child.
Have the children crinkle their paper, mark it, stamp on it,
fold it (anything besides tear it), and then wad it into a ball.
Then have the children unfold their pieces of paper and smooth them out.
Say: Look how dirty and scarred it is... it will never be the same.
Have the children apologize to their pieces of paper.
Say: “Even though we have tried to smooth out our papers...
and we have apologized, we have left scars behind.
Those scars will never go away, no matter how hard we try to fix them.
That is what happens when a child bullies another child.
They may say they are sorry...but the scars will be there forever.”
Give And It Shall Be Given Unto You - Object Lesson
Luke 6:38

Giving of your time, talents, and
treasures. Luke 6:38
For this object lesson, you will
need one (or more) play (bouncing)
ball(s). (See the last page for more options...and more fun ways to teach this object lesson!)
Bible: Luke 6:38
Jesus said this in Luke 6:38.
Give, and it will be given to you. A good measure, pressed down, shaken together, and running over, will be poured into your lap. For with the measure you use, it will be measured to you.” NIV
Today, we’re going to use a simple play ball to help us understand Luke 6:38.
(hold up the ball for all to see)
This little ball is not a baseball.
It’s not a basketball.
It’s not a dodgeball or a 4-square ball.
It’s not a golf ball...a soccer ball...or
even a ping pong ball.
It’s just a simple bouncy ball!
There isn’t anything special about it.
In fact, its only purpose is to
BOUNCE, TOSS BACK AND FORTH,
OR ROLL AROUND!
BUT today...this little ball is going to be more valuable than all the other balls...because it is going to help illustrate Luke 6:38
So to begin with, let’s imagine that this little play ball represents our wealth.
Our wealth, meaning, our time, our talents, our things, our treasures...whatever God has given us.
That’s our wealth!
So this little ball represents ALL that God has given us.
Now we can take our wealth (hold up the ball) and hold on tightly to it.
(Hold the ball tightly in both hands).
We can carry it around with us all day.
But the Bible tells us that what we give, we will receive.
Give, and you will receive...isn’t that what Jesus said?
So, I could hold my wealth tightly, maybe I will stick it under my arm or carry it in my hand, or maybe stick it in a bag or backpack...and I could
walk around all day long...holding tight to all my wealth.
But God tells us to give!
So, when we look back at this little ball, what did we say it is used for?
To roll around, to toss back and forth, and to BOUNCE.
But if I hold this ball close all day long...
Am I getting to enjoy it?
Am I using the ball for what it was
intended for? NO!
Its purpose is to BOUNCE!
If this ball represents my wealth...and I’m holding tightly onto it. Then what good is it?
Am I getting any fun out of holding onto my wealth? It’s not doing any good...I’m just holding onto it.
If God gave you a beautiful singing voice and you’re not using it to share Christ...then what good is it?
If you have the gift of teaching or a love
for children, and you’re not using that gift to teach and share Jesus...then what good is it?
If you have money and you can give to send a child to camp, and you’re not using it to help a child go to camp...what good is it?
Jesus said GIVE and you shall receive.
But here’s the thing...the only way you can give...is by letting go!
(Toss the ball into the crowd)
And when I give (have someone toss you another ball)...I receive.
You can’t give with a closed fist (make a fist).
What do you have to do? You have to open your hand... and LET GO...you
have to give!!
(Toss the second ball into the crowd)
And when I give (have someone toss you another ball)...I receive.
Jesus tells us to LET GO of our wealth.
Use it to share God’s word, use it
to help those in need, use it to minister
to others.
And when we LET GO (toss another ball) of our wealth...Jesus tells us we will receive (have someone toss you another ball)
Now, if I bounce this ball, what happens? It comes back to me doesn’t it?
Does it come back smaller?
No, it comes back to me the same size.
Does it come back larger?
No, it comes back to me the same size.
I get the same amount back that I give.
This passage doesn’t say we will receive more than we give; it tells us that we will receive the same amount we give
away.
So learn to GIVE (toss the ball), and watch as God sends it back! (have someone toss you another ball)
You may purchase and TOSS as many balls as you choose during this lesson.
Just make sure that someone tosses one back to you when you give one away.
If you can only afford one ball, then adjust the lesson...perhaps tossing the ball and having them toss the same ball back to you.
If you are a larger church and you choose to purchase all the balls mentioned at the beginning of the lesson, you can do that as well.
As you are saying...“It’s not a basketball.” Shake your head and dismiss the basketball as if it’s useless. (Give the ball to a child.) Then continue down the list of balls.
Have someone replace a new identical ball each time you give one away...act surprised when the identical ball you gave away returns on the table full of balls.
Soaking Up God's Word - Object Lesson

Soaking Up God's Word
As has just been said: “Today, if you hear his voice, do not harden your hearts as you did in the rebellion.”
Hebrews 3:15
Just as a sponge absorbs water while a rock remains unchanged, our hearts can either soak up God's Word or let it pass by.
Choose to be the sponge.
For this object lesson, you will need:
-
Sponge
-
Stone about softball size or larger (any shape)
-
Small plastic tote with about 1" of water in it
-
Squirt gun (or spray bottle filled with water)
If you want to add more impact to the lesson, cut the sponge into the shape of a heart.
Object: Comparing how the Word of God (represented by the water) will not affect someone with a hardened heart (represented by the rock). But...the Word of God WILL affect someone with a soft heart (represented by the sponge.)
Before class
-
Fill your water gun (spray bottle) with water and make sure it works.
-
Fill the plastic tote with 1" of water.
Let’ Begin
Hold up the rock and say: Do you see this hard rock?
This rock represents the heart of someone with a hard heart.
Place the rock inside the tote filled with water.
Hold up the squirt gun (squirt bottle) and say:
The water in this squirt gun represents the Word of God.
(If you want to add fun to your lesson, squirt it across the classroom a couple of times, misting the children.)
Squirt the rock with the squirt gun several times.
Say: When we try to explain the Word of God to someone with a hard heart, someone who doesn’t know Jesus and doesn’t even want to know Jesus... it will not soak in.
It just rolls off.
Hold up the sponge.
Squeeze it a few times and talk about how soft and pliable it is.
This sponge represents someone with a soft and open heart. Someone open to hearing and learning about Jesus.
Pick up the water gun (squirt bottle and mist the kids again.)
Then squirt the sponge several times.
When we explain the Word of God to someone with a soft, open heart, they will soak up the information.
They will allow the Holy Spirit...God...in!
So, here’s the question: Do you choose to be the sponge?
(Mist them again)
Soaking up everything you can about Jesus.
Or, do you choose to be a stone?
(Mist them again.)
Refusing to hear or learn anything about Jesus?
Simply allowing the words to roll off of you?
Choose to be a sponge...soaking up every bit of “Jesus” knowledge you can!
Mist them a lot!
Note: If you want to mist the children, you may choose to have two identical bottles...one on a very fine mist and a second (strong stream) bottle to spray your rock. You might even want to have teachers standing behind the children that spray them with the mist while you teach.
If the teachers could be hidden behind the children, it would be even more fun!
"Let the word of Christ dwell in you richly, teaching and admonishing one another in all wisdom."
Fun "take and share with others" idea: Look for the sponge capsules (Wal-Mart) that you drop into water to reveal a sponge shape! If you can find ones with a heart shape inside, that would be even better. You might even do one or two in class and have the children take their capsule home to share the message and reveal their sponge design inside!

Reaching Others For Christ - Object Lesson

For this object lesson, you will need:
A set of dominoes
Markers
Masking Tape
Begin by placing masking tape on the back side of two dominoes
Draw a stick figure on both dominoes.
On domino # 1, place a Bible in the stick figure’s hand and a smile on their face.
On domino #2, add a sad face.
Set the two stick figures on the table, leaving a great distance between them.
On a separate table, line up a row of dominoes. 15 or so...whatever you choose. (Note: You won’t use these until the very end)
Hold up stick figure # 1 and say:
This child is going to a great church; he knows all about Jesus; he reads his Bible every day... and he wants to tell the WHOLE WORLD about Jesus.
BUT...it’s a really, really, really BIG job for just one little kid!
(Set domino # 1 at one end of the table)
Hold up stick figure #2 and say:
This little boy lives WAAAAAAAY over here (set him at the opposite end of the table). He has never heard of Jesus. He has no one to take him to church. He has no one to teach him about Jesus.
BUT...what if this little boy (#1) could tell just one person about Jesus? (Start lining up dominoes behind domino #1.) And then that person could tell another person about Jesus, and then another, and another, and another.
Continue lining the dominoes up until you reach domino # 2.
If he (#1) could tell just one person about Jesus, it could set off a chain reaction.
With kids telling kids...all over the world...like this!
Tip domino #1 backwards to start a chain reaction knocking all the dominoes down...including domino #2, which is at the end.
Pick up the two dominoes and say:
So now, this little boy (domino #1) has shared Jesus with this little boy (domino #2) even though they live a looooog distance apart.
And now this little kid (domino #2) can tell other kids about Jesus, too (set domino #2 at the front of the line of dominoes that were set up in advance), and the word of God will travel around the world again...and again...and again!
Flip domino #2 backwards to knock down all the dominoes.
Satan's Trap - Temptation - Object Lesson

For this object lesson, you will need one jar and one ball.
(Note: You will need to test to see what size
ball you will need.
The ball should be SLIGHTLY smaller than the mouth of the jar.
The jar HAS TO BE large enough for a child’s hand to go inside of it.
The object is that the ball will go through the mouth of the jar, but it cannot come back
out with your hand wrapped around it.
You have to LET GO before you can get
your hand out.
This object lesson is called “Satan’s Trap”
Drop the ball into the jar.
Say: Sometimes Satan tries to trick us by putting something in front of us that looks really, really good. And we want it REALLY bad.
We are tempted to reach out and grab it even though it is not ours.
Instruct the child to place their hand into
the jar, wrap it around the ball, and pull it out.
Say: But, when we reach out to grab
it, it grabs us instead.
Instruct the child to continue holding onto the ball, then try to pull their hand out of the jar.
Now, instead of you grabbing onto “IT”,
“IT” has a hold on you.
Do you know what “IT” is?
“IT” is sin. Sin now has a hold on you.
AND until you voluntarily let go, you will
continue to be held captive.
Instruct the child to let go of the ball and
pull out their hand.
You see, it is not sin that has a hold on to us.
It is us who have a hold on sin.
As long as we hold on to that which God hates,
we will be held captive.
Jesus died for us to give us the power to
"resist the Devil".
Jesus, can help us let go and be free.
Build Your House Upon The Rock - Object Lesson
.jpg)
The Wise and Foolish Builder
Matthew 7:24-27
This object lesson will show why it is important to build our lives on a solid foundation.
That foundation is the Word of God
For this object lesson, you will need:
2 small plastic totes (leakproof)
2 paper cups—(If you have access to some 2X4s and a person to saw them to length for you...do so!) You will need 8 small pieces of 2X4...cut into 4X4 lengths. The boards will represent the 4 walls of both houses. Note: a 2X4 does not measure a true 2X4, so cut the boards to approx. size)
1 small bowl (to create your sand mold)
1 larger bowl to mix your sand in
Sand
2 Bricks
A pitcher of water
Before class, fill the pitcher with water. Draw doors and windows on the paper cups (or 4 of the blocks of wood)
Set out everything you will need for the lesson.
Object Lesson:
While talking about the foolish man, moisten the sand (slightly). Once the sand is sticking together, fill the smaller bowl. Pack it in tightly as if creating a solid sand mold.
When finished making the sand mold. Carefully dump it out of the mold and into one of the plastic totes.
Take a paper cup (or 4 pieces of wood) and carefully set it on top of the sand. If using wood, set 4 pieces up to form a square (4 walls of the house).
Say: Do you believe anyone could be so foolish as to build their house on top of sand?
Say: “Others are much wiser and they will build their house on a good foundation.”
While talking about the wise man, set two bricks side by side into the bottom of the second tote. (Side by side)
Take the second paper cup (or the last 4 pieces of wood) and build the second house on top of the brick.
Say: Which house do you think will stand, and which house do you think will be destroyed?
Say: The Bible tells us in Matthew 7:24-27 that anyone who hears the words of God and puts them into practice is like a wise man who built his house on the rock. The rain came down, the streams rose, and the winds blew and beat against that house; yet it did not fall, because it had its foundation on rock.
Take the pitcher of water and pour on the bricks.
Jesus then said “but everyone who hears these words of mine and does not put them into practice is like a foolish man who build his house on the sand. The rain came down, the streams rose, and the winds blew and beat against that house...and it FELL with a great CRASH”
Take the pitcher of water and pour it on the sand...The house will come tumbling down!
Talk about the two choices, ask questions
Who is our Rock? Jesus
If we read God’s word and build our lives around what Jesus teaches in the Bible...are we wise or foolish? Wise
If we read God’s Word and live our lives differently from what Jesus teaches in the Bible...are we wise or foolish? Foolish
Why are we wise if we do what Jesus teaches?
Because when we do what Jesus teaches, He is with us through the floods, during the rough times that we will ALL go through in this life.
What kind of storms can God help us withstand?
God’s word tells us that when we build on a firm foundation, He will help
us weather life’s storms.
What Can Wash Away My Sins - Object Lesson

For this object lesson, you will need: A piece of white poster board, yellow, orange, and pink markers, and enough red cellophane to cover the poster board. (You can get the cellophane from a craft store or florist shop.)
This object lesson demonstrates that the blood of Christ can cleanse any sin. Before doing the lesson, write a word on white paper with each marker to see which one you want to use.
Place the cellophane over the words to ensure they can’t be seen through the cellophane.
You may have to experiment with different markers. Some of the darker ones may still be visible through the cellophane.
For this lesson, place the poster board on an easel with something behind it for support (such as a heavy piece of cardboard). The support will make it easier to write on.
Tip: I normally tape the cellophane to the top of the poster board and flip it over backwards.
When it is time to cover the list of sins, I flip the cellophane forward to cover the front.
This is much easier than fumbling around trying to hold the cellophane in place.
Ask the children to give you a list of sins that people commit and write them on the board with the markers.
Let the boys and girls tell you as many as you can get on the board.
When the page is full, go back and pick a few to discuss.
For instance, for 'stealing' ask the class: "Could you forgive someone who stole the money you had worked all summer to save for your mother's birthday present?"
Let them respond and say something like: "That would be hard for me to forgive because I would be very angry."
Pick out other sins to discuss.
With older children, sins like 'murder' or 'arson' might be discussed.
The point is to get the children to agree that some sins are very hard for us to forgive.
No w ask the class if God would forgive some of those very bad sins.
Even in the most knowledgeable class, there will probably be a child who will say he will not.
Then say, "What does God say in his word?"
Open your Bible and read I John 1:7 "The blood of Jesus Christ his (God's) Son cleanseth us from ALL sin."
Ask the class, "What sins will the blood of Christ cleanse?"
Repeat the question so they can answer 'all' in unison.
Now take the red cellophane and place it over the poster board. The children will be absolutely fascinated; they cannot see the list of sins.
Let them all come up close and quietly look. After they've returned to their seats, give an invitation for salvation for those children who have never had Jesus wash their sins away.'
Bouncing Back - Object Lesson
Bouncing Back When Life is Unraveling Around You.

Object lesson: When life is unraveling around us
For this object lesson, you will need an old baseball and something to cut the laces with. A utility knife works well, but be careful with it.
Cut a few of the laces before class and scuff them up even more.
For this object lesson, choose anyone from the Bible who has been through unraveling times. Job, Joseph, etc.
Hold the baseball up.
Talk about the appearance of the baseball, how it is battered and beaten down. How it has been knocked around. Scuffed up and coming apart at the seams. But it is still holding together!
Cut the remaining seams and remove the outer skin.
Find the end of the string and start to unravel the ball.
Discuss how, when things seem to be unraveling around us, and we can’t control it, fear will often step in and try to get us focused on all the bad things going on, instead of GOD!
Talk about how we all go through "unraveling" times.
Talk about the character you have chosen to teach about.
Keep unraveling as you discuss things that happen in our lives that can unravel us. Allow the children to join in the conversation.
Talk about some things that can really throw us off our feet.
As you get to this part, take the end of the string, hold tight, and toss the ball gently across the floor...this will unwind the ball faster.
Continue discussing things that unravel us while you pick the ball back up and continue unwinding.
Talk about what we can do when we are going through unraveling moments in our lives...pray, lean on a friend, cling together as a family.
And sometimes, we have to roll with it....holding the end of the string, roll the ball gently across the floor. (This will unwind even more of the string.
As you get to the center of the baseball, you will find a small red bouncy ball.
When you get to the center, say... "And then all of a sudden, we make it through our difficult moment, and guess what? GOD helps us bounce back." (bounce the little ball on the ground)
In Psalm 34:18, we read this:
“The Lord is close to the brokenhearted and saves those who are crushed in spirit.”
This verse tells US that no matter what we are going through, God is near and can provide help and support when we need it most.
If you choose to do a craft, consider my baseball framed craft "Everyone commits errors" craft. You can often get a lot of old baseballs from your high school baseball team.
You can change the verse to fit with the theme if desired. You will need one old baseball (skin removed) per child.
If you choose to make the craft, the skinned balls make a GREAT "Minute to Win It" type game. Allow the children to unwind the balls of string to see who can get to the center first.
You can also discuss how life is a race...full of challenges, full of unraveling moments, but if we lean on Jesus, He will help though our unraveling moments...and bouce back!
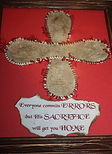
Find more information on this craft by scrolling though my "Freebies"
Think Before You Speak - Toothpaste Object Lesson
.jpg)
Think Before You Speak!
For this object lesson, you will need a tube of toothpaste and a paper plate.
This object lesson is an oldie...but definitely a goodie!
Cutting Words
Has anyone ever said something to you that has hurt your feelings?
Have you ever said something to someone that hurt their feelings?
In James 3:5-10, the Bible, God tells us a lot about the words we use and how we use them. We can use our words to build people up, or we can use our words to tear people down.
Object Lesson: Select a child and have them come forward. Explain to the children that the toothpaste represents the words that come out of our mouths.
Ask the child to squirt out ALL the toothpaste from the tube onto a paper plate.
When they begin, say: "Wow, look at all those words spilling out of our mouths!"
The Bible tells us that we cannot control our tongues…they are always wagging…they are always in motion.
Why do you think the Bible speaks so strongly about our words?
Think about a time when someone's words hurt you. How did you feel?
God knows how cruel our words can be. He knows how they can destroy.
God wants us to be VERY careful when choosing what comes out of our mouths.
Words can hurt, they can destroy, they can divide, they can ruin all the hard work someone has done.
So we must be aware of what we allow to come out of our mouths.
Invite a second child to come forward and ask them to put the toothpaste back into the tube. (If you choose, you can provide a spoon, a knife, etc., as props to help put the toothpaste back into the tube.
While the child is trying to put the toothpaste into the tube, say to the child, "You keep trying, while I continue with the lesson."
Say: Although our tongues are always wagging, WE get to choose what is coming out.
God tells us that our words can be used for GOOD as well as for bad.
Although our words can destroy and divide, they can also be uplifting, encouraging, and praising.
We need to think before we speak. We need to ask God to help us use our gift of speech in a way that are pleasing to Him.
Sometimes a forest can catch on fire…it can burn thousands and thousands of acres as well as homes.
How do you think the fire begins? It began with just one little spark.
The Bible says that our tongues are just like a forest fire. We can speak just one little mean, cruel word and it spreads just like a wild fire.
The person that we were cruel to may tell one of their friends…and then that friend tells another friends…and then those friends tell other friends…and pretty soon, it is a BIG BLAZING...OUT OF CONTROL FIRE!!!
Look at the child who is trying to put the toothpaste back into the tube. Ask "How is it going?" and then tell them to keep trying while you continue with the lesson.
How do you think firefighters control a forest fire? It takes lots and lots of work and sometimes… they just have to give up and let the fire run its course and then burn out on its own.
When it has devoured EVERYTHING in its path, and has nothing left to consume, it just burns out.
When we allow cruel words to slip out of our mouths…we can’t take them back…we can’t keep them from spreading like the wild fire.
Sometimes we just have to sit back and wait for them to burn out.
In the meantime…we have lost friends, we have lost the respect of many others, we have lost our witness, we have lost a lot.
What does it look like after a forest fire has ravaged and area? All black and ugly…nothing of beauty if left.
Families are left with nothing…no home, no possessions, nothing.
When we speak cruel words, we leave nothing of beauty either. Instead, we leave a trail of destruction behind.
Look at the child again and say: Once we squirted all the toothpaste out of the tube, there is no putting it back is there? When we allow cruel words to escape our mouths...we cannot put them back either!
Allow the child to sit down.
There is a saying that says, “If you can’t say something nice…it is better to say nothing at all.”
But that is hard to do, isn’t it? How do we control a tongue that is always wanting to wiggle? It takes effort, doesn't it?
Why do you think it is easier to tear someone down that to build them up?
It is our human nature…it is our sin nature to tear others down because we think that to tear someone down is to build ourselves up. But that is not true at all. When we tear someone down...it says a whole lot more bad things about us than it does about them.
I do not know about you…but I want my tongue to be used for praising and uplifting not for cutting others down.
Let us all practice building others up...not tearing them down!


Run copies (card stock or stiff paper is best) of both the girl and boy craft sheets.
Cut small ½” pieces of several different colors of yarn. (red, yellow, white, black, brown) to be used as hair.
Collect the following: Lipstick (1 or 2 tubes), Q-Tips (to apply lipstick with), Wet ones (to wipe faces), glue
Instructions:
Apply lipstick to each child’s lips (use a Q-Tip for sanitary purposes). If you choose, you can have the child make a fist (tucking their thumb up slightly to make a mouth shape) then paint the thumb end of their hand and press onto the cardstock to form lips.
Allow the children to press their lips onto their own picture, forming a mouth for their craft.
If a child does not want to wear lipstick or have their paint applied to their hand, allow them to draw a mouth on their picture with a marker.
Allow each child to choose the color of yarn they want for their picture, and have them glue their yarn (hair) onto their craft.
Allow time for the craft to dry.
The Balancing Burden of Sin - Object Lesson
.jpg)
The Balancing Burden of Sin - Object Lesson, "Have You Ever" game, plus Plan of Salvation.
For this object lesson, you will need several heavy books... (I always borrow hymnals from the music director when doing this object lesson.)
Before you begin the object lesson, teach the children what "Sin" is by playing the "Have you ever" game.
HAVE YOU EVER? - GAME
You will begin the game by asking everyone to take a seat.
To play, you will ask a question, and if the child has ever done what the question asks, they are to stand (and remain standing)
(All questions are sins...but do not call them sins until you have finished playing the game.)
Ask some ridiculous questions as well as realistic ones.
For instance:
"Have you ever stolen a car?"
"Have you ever robbed a bank?"
"Have you ever told a lie?"
"Have you ever disobeyed your parents?"
"Have you ever taken anything that doesn't belong to you? etc.
Note: Some kids WILL stand when you list the ridiculous questions.
Put those questions first to break the ice and get the children participating. You will quickly find out who your jokesters are!
If a jokester stands up, simply shake your head and tell them you know better, and have them sit down. Remember, this is supposed to be fun, so play it off once or twice before getting serious.
Ask them enough questions (6-8) so that most are standing, then have everyone else sit back down.
Don't address those who did not stand. Some children WILL not admit to wrongdoing. (There are even adults who won't admit it!)
Explain to the children that each thing mentioned in the game you played is SIN!
The Bible says we are ALL sinners and fall short of the glory of God...We are separated from God!
How do we know if what we are doing is a sin?
Sin is choosing to do things our way instead of God's way.
How do we know if it's God's way? By simply asking ourselves one simple question. "Would my action make God happy or sad?"
Optional: Make two cardboard circles...draw a smiley face on one circle and a sad face on the other. Glue a tongue depressor to each smiley face as a handle.
Go through the questions you asked during the "Have you ever" game above as well as some questions that would make God happy. Ask the children if that would make God happy (hold up the happy face) or sad (hold up the sad face).
Once they answer, hold up the correct face.
Object Lesson:
Select two children (the stronger the better for this object lesson)
One person (the strongest) will hold their arms out straight to their sides with palms up.
As you list each item from the game above, have the second child place a book in the palm of the child with outstretched arms. (keeping the books balanced). 3-4 books in each arm should be plenty.
As the book is being placed in the palm...remind the children that ___________ is a sin.
Once the child has 3-4 books in each palm, have them stand that way as long as they can.
Tell the children that while on the cross, Jesus bore the weight of our sins. He endured the punishment we deserved.
While sin separates us from God, Jesus provided the way for our sins to be forgive.
In Isaiah 53:4-6 the Bible tells us this:
“Surely He has borne our griefs and carried our sorrows; yet we esteemed Him stricken, smitten by God, and afflicted. But He was wounded for our transgressions, He was bruised for our iniquities; the chastisement for our peace was upon Him, and by His stripes we are healed.”
While we all carry the burden of our sins, Jesus took upon Himself the ultimate burden—the sins of the entire world.
Download God's Perfect Plan Below as an add-on to the object lesson or use it as a stand-alone lesson any time.
God's Perfect Plan - Object Lesson
You can use this lesson as part of the Balancing Burden of Sin Lesson above or as
a stand alone lesson anytime.

Words Hurt - Words Matter - Words Leave Scars - Object Lesson

Words Hurt - Words Matter - Words Leave Scars - Object Lesson
For this lesson, you will need 2-3 small lengths of 2X4 wood (more if you have lots of children),
some nails, and a hammer with a claw end.
To begin your lesson, show the children how perfect and beautiful the wood is.
Talk to them about how smooth the wood is with no flaws (note, you may want to sand the boards smooth
before class so that you can let the children feel how smooth the wood is.
Say: There once was a little boy who had a bad temper. When he got angry, he said hurtful things to his family and friends.
His Father gave him a big bag of nails and told him that each time he loses his temper, he must hammer a nail
into the back of the fence.
The first day, the boy had driven 37 nails into the fence.
In the Bible, in James 3:5, it tells us that the tongue is a small member of our body, but it boasts of great things. It also tells us that one spark can set a great forest ablaze.
Meaning that one mean word...or one bit of gossip... that we allow to slip off our tongue can cause great damage. It can start fights, it can cause us to lose friends, it can destroy relationships...it can leave scars that last forever. (Elaborate as much as you like here.)
Say: Over the next few weeks, as the little boy learned to control his anger, the number of nails hammered gradually dwindled.
He discovered it was easier to hold his temper than to drive those nails into the fence. Finally, the day came when the boy did not lose his temper at all.
ACTION: Allow the children to pound the nails into the 2X4's. (Do not hammer the nails flat...leave a little space
because you will be removing them later.)
Say: The boy told his father that he was now able to control his temper, and his father suggested that the boy now pull out one nail for each day he was able to hold his temper.
The days passed, and the young boy was finally able to tell his father that all the nails were gone.
ACTION: Allow the children to remove the nails.
Say: The father took his son by the hand and led him to the fence. He said, 'You have done well, my son, but look at the holes in the fence. The fence will never be the same.
ACTION: Allow the children to look at the scars on the board...feel the damage (pass the boards around.)
When we say things in anger, they leave a scar just like the ones on our boards.
It doesn't matter how many times we say I'm sorry, the wound will still be there.
A verbal wound is as bad as a physical one.
Remember that friends are very rare jewels indeed. They make you smile and encourage you to succeed; they lend an ear, they share words of praise, and they always want to open their hearts to us.
But remember your greatest friend of all is Jesus, who still bears the scars from the nails pounded into his body. He took our punishment...but He still loves us. In fact it is because of His great love for each and every one of us that He endured the pain.
There is an old hymn (song) that says "When He was on the cross, I was on His mind."
The Bible in Romans 6:23 tells us that the wages of sin is death, but the gift of God is eternal life in Christ Jesus our Lord.
Optional: Cut a small 2X4 for each child to take home. Allow them to write "Words Hurt" across the front of the board.
Have them pound 2 nails in their board (one flat) and then remove the second one to reveal the scar.
Oil Fears Water
.jpg)
Looking for an object lesson on Sin? A lesson on how sin separates us from God? A lesson on God defeating sin?
For this object lesson, you will need 5 simple objects!
A small jar with a lid
Water
Oil (cheap vegetable oil is fine.)
One egg (raw)
One egg (boiled)
THE WATER - REPRESENTS LIVING WATER.
POUR THE WATER INTO THE JAR
In Jeremiah 17:13, the Bible refers to Jesus as the "Spring of living water."
“Those who turn away from you will be written in the dust because they have forsaken the Lord, the SPRING OF LIVING WATER”. So, for this lesson, the water we have right here... is Living Water... it represents Jesus!
THE OIL—REPRESENTS SIN
What is sin? It's choosing your way instead of God's way.
In Jeremiah 17:13 it tells us that sin separates us from God.
When we tell a lie, that’s a sin...and it separates us from God. When we disobey our parents or our teachers...that’s a sin...and it separates us from God. Even a bad thought about someone else...is a sin...and it separates us from God.
Hold us the oil and say, "Before we add the oil into our jar, let’s touch it. (You may want to select a person to come feel the oil, or you may pass a separate jar with a small amount of oil in it around the room)
How does the oil feel? Slimy, Greasy, Messy...just like sin.
The Bible tells us this in 1 John 3:8: “The one who does what is sinful is of the devil, because the devil has been sinning from the beginning. The reason the Son of God appeared was to destroy the devil’s work.
So when we sin...what happens? We are separation from God.
ADD THE OIL TO THE WATER
Look at that...the oil and water have separated from each other.
The oil is actually repelling the water. Which means that it is refusing to mix with the water.
Did you know that there is a name for that? It’s called hydrophobic or “water fearing.”
The oil…fears the water, so it clings tightly together to repel the water.
Do you think that Satan fears God? Absolutely!
When we sin...it separates us from God.
But remember…the oil “fears” the water. So sin fears the living water...Satan fears God!
THE EGG REPRESENTS THE TRINITY
So let’s look at our last item...an egg. What do you think this egg represents?
It represents God...the Trinity. God the Father, God the Son, and God the Holy Spirit.
For this object lesson, the shell represents God the Father.
The white...or clear part represents God the Son...Jesus.
And the yolk or yellow part represents God the Holy Spirit—All separate...but all one! All God!
If we take this hard boiled egg...and we peel off the outer shell (crack and peel) it is still part of an egg isn't it?
If we take off the white part...it is still part of and egg isn't it? (Peel off the white)
And we take the yellow center...or the yolk, it's still part of an egg isn't it?
The egg has three parts but it is still...an egg!
God is one being who exists in three Persons. The Father, The Son and The Holy Spirit.
So if sin (hold up the jar) fears the living water...If Satan Fears God.
And if sin separates us from the living water...if sin separates us from God.
What do you think will happen when we add God?
(HOLD UP THE RAW EGG)
“God the Father” (crack the egg open) God the Son (separate the white...letting it drip into the jar) God the Holy Spirit (drop the yolk into the jar)
PUT THE LID ON THE JAR AND GIVE IT A GOOD SHAKE
Look...the oil has disappeared.
When we ask God to forgive us of our sins...and to come into our hearts and be our Lord and Savior...He will forgive us of our sins...and He will come into our hearts and be our Lord and Savior.
He will wipe our sins away...and then what will separate us from God? Nothing!
If we have asked God to forgive us of our sins and to come into our hearts to be our Lord and Savior...NOTHING will separate us from God!
And then where will we go when we die? To heaven!
Let's look at our jar once more. What do we see? A white puffy cloud of foam...or cloud... that is left on the top of our water...which reminds of of heaven...our forever home!
Light of the World - Object Lesson
Light of the World Object Lesson
For this object lesson, you will need a jar, a short, tapered candle (cut the candle down so that when held up to the jar, it only comes up about halfway...short candle), a lighter or match, and a container of water with enough water to fill your jar to the rim.
Set up your object lesson in advance.
Place the object lesson so that the children cannot see the backside of the jar.
Drip a tiny bit of hot wax onto the table and insert the candle's end into the wax to help it stand on its own.
Place the empty jar in front of the candle.
Set a container of water next to the object lesson. It would be a good idea to cover the object lesson with a large box once it is set up so that the children cannot see it in advance.
Light the candle before you begin your lesson so that the children cannot see you lighting it.
In the Bible, in Matthew 5, Jesus says that we are the light of the world.
But the world does not like the light, and it is always going to try to put your light out!
Slowly fill the jar with water from the extra jar of water while saying... "But no matter how hard the world tries to put the light out...it cannot."
Fill the jar to the rim, making sure the water level is above the flame level.
Why do you think the world cannot put out the light? (Take Guesses).
Then slowly, pull the jar to the side, revealing the candle sitting behind the jar while saying..."Because we are not part of the world."
When we walk with Jesus, we are not part of the world, so the world cannot blow out our light, it can't drown our light, it cannot hide our light!
But...guess what? When we become part of the world, when we do things that God would not approve of...WE can put our light out! (Drop the candle into the jar of water, putting the light out)
How can we put our light out?
By becoming a part of the world!
Discuss the ways that we become part of the world.
Discuss ways that we can be the light.
A great craft to couple with this object lesson would be the Nightstand Nightlights...with light scripture...to remind them that they are the Light of the World.
A FREE PDF of the object lesson, instructions and the the nightstand nightlight can be found below (scroll down) or search my website at https://www.steppingoutministry.com/freebies
.jpg)

Scripture Lanterns - Smaller Jars - Pint Size
In advance:
1. Have each child select their favorite scripture that refers to Jesus being "light"
2. Copy and enlarge each scripture
3. Cut around the scripture in a scalloped fashion. Leaving lots of space so that the edges can be burned. Note: Run 2-3 of each scripture verse just in case they do not burn correctly.
4. Carefully burn around the edges of each scripture making sure not to burn any of the actual scripture. An adult should do this and burn only a small section at a time.
Gather the following supplies
1 jar (with a lip) for each child
Each child's chosen verse
Glue
Water
Small paintbrushes
String (jute)
1 battery-powered candle per child.
Elmers Glue
Water
On Craft Day
Mix the glue with water to make a thin glue (decoupage)
Give each child a jar, their verse, a small paintbrush, a small paper plate with decoupage on it.
The child will paint the back of the memory verse with the decoupage and stick to the jar.
The child will paint another layer of decoupage over the memory verse making sure that all edges are stuck well. Don't over-paint the jar with decoupage or the verse will rip. If it rips, just use a little decoupage and mend it,
The child will then paint their entire jar (outside and inside) with a thin layer of decoupage.
Once the decoupage is dry, wrap a string around the jar (under the lip) a couple of times and tie it in a knot.
Create a handle using string or a thin wire.
Place a candle inside each jar.


Larger Nightstand Nightlights! Uses 1 Quart Jar
Jesus is the light! Here's another great Daylight Saving Time craft...or anytime craft!
Allow the children to select their favorite "light" scripture verse (do this a week or so before you are ready to create your craft. Run a copy of the page, and then a copy of the actual verse they chose. Enlarge the verse to fit the type of jars you use. Cut around the edges using no particular design. Note: I like to burn around the edges of the verses to create a more vintage feel. If you use this method, leave a lot of extra paper around the verse before burning the edges. It is good to do this over a sink so that you can douse any verses that gets out of control. (Do this before class)
~Start by twisting a piece of wire around the jars to create a handle.
~Mix some glue with water to make a glue glaze. (about 50/50)
~Allow the children to paint the entire outside of their jar with the glaze.
~Place the scripture...(or layer a scripture on top of the scripture page) and paint over it with the glue. Stick down all edges. Allow to dry.
~ Add a ribbon or any additional decorations you choose.
~ Drop a battery-operated candle inside to create a bedside lamp.
Tips: For a glow-in-the-dark lantern, use (thicker ratio) glow-in-the-dark glue and the smaller scripture verse only. (Light up the night event)
For a Fall festival/Halloween alternative event where the children will be carrying the lanterns, use a plastic jar, such as a peanut butter jar.


Ugly Fall Sweater Competition

Create a little Fall Fun by hosting an ugly fall sweater competition. Competition can be held "in person" or you can challenge your kids, your families, or your entire community. Participants simply take a pic of themselves in their "ugly fall sweater" and submit it on your Facebook page...under your Ugly Fall Sweater Competition post.
Homemade Soap
Fun craft to help teach that Jesus forgives us of our sins
and washes them away
(Quick and easy craft time)
Running low on soap?
No problem, whip up your own with just 1 bar of soap and 1 gallon of boiling water!
A Great craft for the kiddos to help with!
You will need:
1 bar of soap (4 ounces)
1 gallon of water (3 quarts if you like a thicker soap)
1 large pot
1 container to hold your soap
Note: If you would like to add scented oil to your soap...or use a scented bar...you have that option as well.
Step One
Grate 1 bar of soap. You may use a grater, a potato peeler, or even a knife (but be careful).
The object...to get the soap shredded into small pieces so that they will easily melt in the boiling water. Use whatever works best for you...or whatever you have around the house.
Hint: This is a great time to use up all of those little travel soaps that you have around the house!
You will need 4 ounces of soap.
Step Two
Place 1 gallon of water (slightly less if you like thicker soap) into the pot and bring the water to a boil.
Step Three
Remove the pot of boiling water from the stove and stir in the soap flakes (grated soap)
Stir until flakes are melted
Put the lid on the pot and let sit for 24 hours.
Step Four
Use a hand mixer to mix the soap (it will be thick to start with)
Once blended, pour the soap into a container or squirt bottles.
That's it!
Easy Peasy...great kiddo craft!

Lunch and Learn - Brown Bag Special

Drop off a "brown bag special" lunch to several of your kiddos each day and enjoy a zoom lunch and devotion time. Repeat until you have had lunch with each of your kiddos.
Want to reach families? Drop off lunches to families and enjoy the outdoors... socially distancing lunchtime together.
Keep lunches simple and enjoy time together.
Budget Saving Tips

Holiday Sales
Holiday sales are a children's leaders dream come true. Items can be purchased for almost nothing and stored away for the following year...even many food items such as a gingerbread house, candy, etc. Just check your expiration dates.
You do have to be quick. Go early the day after, and continue to check for a few days.
The day after is usually the best picks, but they continue to reduce the price for several days after the holiday.
Use your imagination...an Easter bunny makes a great prize at any time of the year. Suckers are always a perfect snack...and a bubble wand at the end of summer is just as fun at the end of summer as it is at the beginning.
When you see items on clearance, think about where you could use them.
The following are a few ideas to get you started.
After Easter Sales
-
Easter Bunnies - Easter Bunnies can be used for prizes at any time of the year. If you remove the tag and perhaps a ribbon (if it says Easter on it) you have a regular bunny.
-
Bunnies for new babies born in the nursery (Remove ribbon for safety)
-
Treat Bags (Check Hobby Lobby)
-
Cupcake liners
-
Prizes to hand out
-
Peeps (Fall marshmallow roasting)
-
Confetti Eggs (Outdoor summer egg night activity)
-
Eggs, grass, baskets, stuffed animals (For next years egg hunt)
-
Look for candy that is not holiday-specific and that will store well. (Fall Festival)
After Christmas Sales
-
Gingerbread houses - Use to make Valentine houses - Decorate with Valentines Day candy
-
Purchase red paper plates to be used on Valentines Day
-
Cross Christmas ornaments to use on Easter (Hobby Lobby has them 75%to 90% off.)
-
Fluffy “snowballs” use them all through the year for glow in the dark dodgeball. They don’t hurt when someone is hit.
-
Christmas Cards - Missions
-
Treat Bags (Check Hobby Lobby)
-
Cupcake liners
-
Hershey Kisses and separate the colors - red for Valentine's, green for St. Patrick's and silver for Easter.
-
Stocking stuffers for next year
-
Prizes to hand out
-
Clearance prizes for VBS
Valentines Day
-
Bags of candy - Use for Easter
-
Treat Bags (Check Hobby Lobby)
-
Cupcake liners
Back to School Sales
-
Restock your supply cabinet...pencils, crayons, markers, paper.
-
Backpacks and pencil holders...Bible Buck Store.
After Summer
-
Pool noodles - can be used for endless games
-
Water Balloons
-
Bubble Wands (Great back to school gift or prize item)
After Halloween
-
Wigs and Costumes
-
Glow sticks - for glow in the dark events
-
Treat Bags
-
Cupcake liners
-
Face paint for spring carnival or VBS, etc.
Thrift Stores and Yard Sales
-
A Thrift store or yard sales is a PERFECT place to look for props. VBS, plays, musicals, etc.
No-Cook Playdough
Recipe
This is so easy to make – no cooking required!
Simply mix all the ingredients together and in 5 minutes you have perfect playdough!
You will never need to buy it from the store again!
Ingredients
1.5 cups of flour
1/2 cup of salt
2 tbs of cream of tartar
1 tbs of oil
1 cup of boiling water (An electric tea kettle is a great way to heat your water…safer than a pan of water that can spill easily when trying to pour water.
Food coloring
Directions
Pour the first 4 ingredients into a large bowl and mix well.
Combine 1 cup of boiling water with a few drops of food coloring and stir.
Pour the boiling water into the dry mixture
Please take care when using boiling water around children.
Stir well until the mixture is well combined
Roll it out on a flat surface and you are ready for some playdough FUN!
DOWNLOAD RECIPE


Playdough - 5 minutes
Ingredients
1 cup of flour
1 cup of water
½ cup of salt
2 teaspoons cream of tartar
1 tablespoon cooking oil
Food coloring if desired
Waxed Paper
Heavy Pan or electric skillet
Large Spoon
Spatula
-
Place all ingredients into a heavy pan. (I use an electric skillet to avoid the children being around a hot stove)
-
Cook quickly in a heavy pan, stirring constantly. Flip with a spatula occasionally.
-
Remove from heat when the mixture balls up and pulls away from the side of the pan
-
Place the dough onto a sheet of waxed paper to cool for a few seconds.
-
Knead the dough until soft and smooth.
-
Store in an airtight container.
-
The recipe may easily be doubled
Tip: If you want to make "smelly" playdough, add 1 package of Kool-Aid (any flavor). Smells sooo good! Just dump it in with the dry ingredients and stir.


Playdough Recipe
Balaam's Donkey

.jpg)
Left foot, right foot...feet, feet, feet...how many feet does it take to create Balaam's Donkey!
Use when teaching about Balaam's donkey, Mary and Joseph's journey to Bethlehem, Jesus' birth (stable animals), Jesus' ride to Jerusalem, or any other donkey lesson from the Bible!
Very little prep work! Just grab some construction paper, googly eyes, pom poms, scissors, glue, a hole punch, and string, and you're ready to roll!
I Will Follow Jesus
Here's another great "sewing" craft with a BIG take-home message. "I WILL FOLLOW JESUS."
Borrow a LARGE pair of boots from someone. The bigger the better! My son wore a size 15, which was perfect for this craft!
Using poster board, have the children trace around both shoes and then cut them out. Using a hole punch, have the children punch holes around the outer edge of both shoes.
Provide yarn and blunt-tip needles for the children to use.
Have the children tie one end of the yarn through one of the holes and attach the needle to the opposite end.
Children will sew around the edges of both shoes, decorate them however they choose and write “I Will” on the left shoe and “Follow Jesus” on the right one.
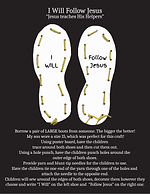
FUN AND CREATIVE FONTS


Create amazing flyers and slides,
by using creative and fun font's
LET'S BEGIN
Enjoy creating your own flyers but hate wasting time looking for the right fonts? Create a font chart and save it on your computer. Just open a new page in word and create a new document titled "Fonts".
List the names of each of your favorite fonts and then highlight each name and select the corresponding font. For instance, type the name "Crazy Dots" and then highlight it. Use the drop-down font menu and select the "Crazy Dots" option. You will have a visual list of each of your fonts. Keep adding to your list. There are a lot of free fonts out there. https://fontbundles.net/free-fonts has a great selection of free fonts with instant downloads that you can download...just to get you started. Make an impact...try out lots of new fonts!
How to load a downloaded font
to your computer
Step one: Downloading and extracting your font
1. Download font…The font will download as a zip file.
2. Create a new folder and save all your font downloads to this folder. Note: Once you have finished installing the font, you can delete it from this folder.
3. Right-click on the zip file (font). Several options will pop up on the right. Hover over the Winzip option. A new window will pop up to the right. Select “Extract to here” and CLICK
4. Your newly (compressed and extracted) folder will automatically appear inside of the same folder that you are working in.
Leave this folder for a few moments.
Step two: Installing your font
1. Click the 'Start' menu on your computer
2. Select the “Computer” option
3. Select the Local Drive (C Drive) Option
4. Click the “program files”. My computer has two options. The “program files” and a “Program Files (x86) file. My fonts option is under the (x86) one.
5. Click the “Fonts” option (Mine is called EZ Fonts)
6. Click the 'Fonts folder
Make your screen smaller here…so you can open both of your pages at the same time. You will be dragging your font from your original folder over to the fonts option on your C drive.
7. Go back to your original font download folder, open each folder and drag the downloaded font to the fonts option in your C drive.
8. You may receive a window that says you need permission to load the file…just click continue.
9. Click on the new file and click install.
That's it! Happy Creating!

Teacher/Leader/Volunteer Appreciation
(Framed Poem Art)
Volunteer Appreciation
Looking for a creative way to thank your volunteers, teachers or leaders?
Download and frame this beautiful
poem to show them how much you appreciate all of their hard work and dedication.
Simply download, print and frame!


New Years - Porch Drop - Mission

Celebrate the new year by creating bags stuffed with a party horn, noisemakers, and confetti (or mini confetti popper). Attach a balloon and the above tag. Send home bags, do drop off's, or host your own countdown on Sunday morning by switching things up and counting down to 12:00 (Noon). Teach a lesson about someone from the Bible who changed their lives around...Saul/Paul, Zaccheaus,
The Woman at the well, etc.
Note: If you wait until after January 1st, you can get your party items for almost nothing. Save on your budget by stocking up early..
2026-2035 Download
Willy Wonka Day
Encourage church attendance with a Willy Wonka Event...beginning
on October 1st...National Willy Wonka Day!
Each week (throughout October), children will receive a chocolate bar with a Golden Ticket hidden inside a few of the candy bars. If they receive a golden ticket, they will win one of the large prizes. Select your prizes in advance so that the children know what they are playing for.
You can also add a few extra "smaller" prize tickets inside some of the bars to keep the anticipation going!
Since this is a Willy Wonka event, candy prizes would be perfect. Look for vintage candies that the children may have never seen or tasted before...create a gift basket or bucket filled with yummy treats...or a giant candy bar, etc. You can work the prizes to fit with your families and budget!


Caught You Serving The Lord
Encourage Serving Others

Encourage your children to serve the Lord by serving others.
Teaching a series on "Serving Others?"
Encourage your children to serve the Lord by serving others.
Any time a child is caught serving...give them the "You Got Caught Serving the Lord - Good Job Soldier" award for the week.
Catch them holding the door open for someone in a wheelchair? See a post on Facebook that speaks about a service project they were involved with, Receive a text or a photo from a parent showing their child serving others? Give them the "You God Caught Serving" award for the week. Allow the child to speak about his mission...what he did and how it helps others.
A fun way to encourage serving.
More ways to acknowledge a child's service to others.
Post it on Facebook, add it to your announcement power-point, have them come to the front to receive their reward, etc.
Allow the child to come on stage to explain what their project was and why they chose it.
Ask parents to snap a photo any time their child is helping with a service project...and send it to you.


Fall Family Fun
Leaf Placemats


Family Flashback
Outing and Thanksgiving Craft!
Create your own... "one-of-a-kind" placemats for Thanksgiving
-
Gather your family and head outdoors in search of the colorful fall leaves
-
Cut two pieces of waxed paper (approx same size) for each placemat...you decide on the size.
-
Using scissors, cut off the long stems from the leaves.
Now it's time to create!
-
Arrange your leaves on one of the pieces of waxed paper.
-
Gently place the second piece of waxed paper on top of the first...trying to match the edges the best you can. It doesn't have to be perfect.
-
Pour out any water that is in your iron.
-
Heat your iron...cotton setting or lower.
-
Starting in the center, gently iron over the top piece of waxed paper...trying not to move any of your leaves.
-
Iron until the leaves are flat and the waxed paper is stuck together.
-
Using a pair of scissors, make scallops around the edges of your placemat.
-
Iron your placemat once more to make sure the edges are sealed.
-
You can also make sun catchers in the same manner.
God Made Me Time Capsules
God Made Me!
Are you looking for a craft for creation?
Create time capsules (Pringles cans...decorated with fun paper.)
Have the children fill out information about themselves, including a picture of the child plus anything else you/they wish to include.
For the handprint page, you can either trace around their hands or brush paint on their hands and press them onto the page.
This is a great two-week project (giving the children time to bring tiny things from home to add to their capsule). Painting the handprints on week one would give them plenty of time to dry before going into the capsule.
Seal the time capsule with tape and attach a label with the child's name and instructions to open the capsule on their graduation day.


The Great Pumpkin Patch

Fall is fast approaching!
It's time for warm sweaters, apple cider and LOTS and LOTS of PUMPKINS!
This activity can be used as a porch drop, hand out or drive-thru pickup.
You can add lots of extra fun items into the bag or take away any activity that doesn't work for you or your families.
A few fun items that you can add (if you have the budget) to the bag are:
-
A real pumpkin for the family devotion time.
-
A pumpkin carving set ($1.00 at the Dollar store)
-
A box of "Multicultural" or "Around the World" crayons.
-
A bag of pumpkin candies (the ones that come out in the fall)
-
Dice (2) for the Roll a Pumpkin Game
-
A Candle for the Pumpkin (tea light is fine)
-
If you're doing a "Drive-Thru" consider creating your own pumpkin patch and allowed them to select their own pumpkin.
Roll A Pumpkin Game


Driving Scavenger Hunt

Create a Pumpkin

The Pumpkin Prayer
Prayer Book For Parents To Use While
Carving Pumpkin
(Simply print out and fold together to create a pamplet/book)

Includes downloads for each activity above as well as a Pumpkin Carving Devotion/Lesson
The Sweet Smell of Jesus
Potpourri Bags/Socks
The sweet smell of Jesus!
John 12:3, “Mary therefore took a pound of expensive ointment made from pure nard, anointed the feet of Jesus, and wiped his feet with her hair. The house was filled with the fragrance of the perfume.”
Need a craft for the woman who washes Jesus' feet with perfume? Or, a sweet reminder that "Jesus is always with us?" Here is a "sweet" one with a fragrant reminder that Jesus walks with them every day!
By creating these fragrant potpourri bags (or sock bags) to go in the child's sock drawers...they will be reminded sweet, sweet smell of Jesus every time they open their drawer!
Supplies:
Dehydrated Flower Petals (or several cotton balls)
2-3 bottles of essential oils
Drawstring bags or cute socks (1 per child)
Foam Bowls
Tags (Optional) with a hole in the upper left-hand corner.
Wherever we go, God uses us to make clear what it means to know Christ. It’s like a fragrance that fills the air.
Children will select their favorite essential oil, place a few flower petals (or cotton balls) into the foam bowl, sprinkle a few drops of oil on the petals (or cotton balls), and gently mix the petals with the oil.
Gently place the petals inside a drawstring bag or a cute sock (tied tightly with a ribbon).
A ribbon can be run through the tag and tied in a knot.
This craft can also be used for Mother's Day by simply creating a new tag, such as
“ A mother’s love is more beautiful than any fresh flower. ”


Chocolate Mug Cake
Purchase several inexpensive glass mugs and have the children create a chocolate mug cake for their moms.
Add a few simple ingredients, pop in the microwave to bake and there you have it!
Easy, Peasy, Perfect Mother's Day Gift!
Top with whipped cream and/or wrap with cellophane...tied with a ribbon.
Chocolate Cake in a Mug Gift
3 tbsp all-purpose flour
3 tbsp sugar
2 tbsp cocoa powder
3 tbsp milk
3 tbsp vegetable oil
3 tbsp chocolate chips
1/14 tsp of vanilla (optional)
Add all the dry ingredients into a large coffee mug and stir with a fork.
Add the wet ingredients and blend until smooth.
Stir in the chocolate chips
Set mugs on a cookie sheet and bake at 350 degrees until done. (Stick a toothpick into the center of each mug to make sure that they are done.
Optional: Microwave each mug for 90 seconds. (Stick a toothpick into the cake to make sure it is done)
Once cool, Place each mug inside a plastic baggie and twist tie shut.


Adding Fun Elements
Add fun elements to your teaching!
Keep your children focused and intrigued by creating challenging, funny, or factual slides that you drop into your PowerPoint (or other programs) on Sunday mornings.
In the photo below...how foolish did you feel when realizing that the second clown...was you?
Use a slide such as this one...as a segway into your lesson.
Show the picture and allow the children to stare at it for a few minutes. Someone will figure it out quickly. Once they do, talk about how FOOLISH you felt when you figured out the picture. This would be a GREAT segway into a lesson on The Wise and Foolish Man. (Building your house upon the rock)


Stained Glass

Looking for a new activity to do during your Paint and Praise events? Try this easy stained glass activity. Children will paint with markers to create a one-of-a-kind piece of art. Check out the following video that I created with step-by-step instructions. Although I do not like the voice program that I tried, it should give you an idea of how to create your own stained glass work of art.


My Mother Kept a Garden - Mother's Day


My Mother Kept a Garden
~ Print the poem out onto a sheet of colorful paper, roll it into a scroll, and tie it with a ribbon. Attach a name tag if desired. Attach a packet of flower seeds if desired.
~ Attach the poem to a packet of flower seeds.
~ Print the poem out onto a sheet of cardstock and allow the children to paint and press their handprints onto the cardstock.
~ Purchase small pots of flowers and attach the poem to the pot.

Mother's Day
Personalized Coffee/Hot Chocolate Cups
Hot Chocolate Bar
Looking for something new for Mother's Day?
Why not a hot chocolate or coffee bar...complete with personalized Mother's Day Cup Wrappers. Choose from over 20 wrappers below. Simply download, print, wrap...add a drop of glue to make sure that the label is secure... and you're all ready to go!
Pass out to-go cups filled with delicious flavor coffee's or check out my Hot Chocolate Bar event for ideas on how to host your own.


Mother's Day
Chocolate Covered Strawberries
What mom doesn't like Chocolate Covered Strawberries?
They are soooo easy to make and will add just the right touch to your hot chocolate/coffee bar event.
16 ounces milk chocolate chips (Approx 18-24 Berries...depending on the size of your berries)
-
2 tablespoons shortening
-
1 pound fresh strawberries with leaves.
-
You will need to adjust ingredients to fit the size of your group
-
Wash and dry your berries thoroughly. You may want to do this the day before so that the berries are completely dry.
-
Melt the chocolate and shortening, stirring occasionally until smooth. Some people use a double boiler to melt their chocolate. I use the microwave and stir often.
-
Insert toothpicks into the tops of the strawberries.
-
Holding them by the toothpicks, dip the strawberries into the chocolate mixture.
-
Place the dipped strawberries onto waxed paper or drop them into individual mini cupcake papers to dry.
-
Melt some white chocolate and drizzle over the top of the chocolate if you choose.

Mother's Day Handprint Art


Beautiful Feet - Footprint Craft

Create this sweet footprint craft by using your HANDS!
Simply make a fist, Paint the bottom side of your fist (the pinky side), And press your fist onto a piece of paper.
Dip your pinky finger into the paint and press onto your paper creating toes!
That's it...Super easy!
Prayer Rock
.jpg)
.jpg)
.jpg)

I’m a little prayer rock, and this is what I’ll do.
Just throw me on your pillow until the day is through,
Then turn back the covers and climb into your bed
and whack...your little prayer rock will hit you on the head.
Then you will remember when the day is through
to kneel and say your prayers as God loves you to do.
Then when you are finished, just dumb me on the floor.
I’ll stay there through the night and give you help once more.
When you get up the next morning, clink...I’ll stub your toe.
Then you will remember to talk to God before you go.
Put me back upon your pillow when your bed is made.
And your clever little prayer rock will continue in your aid.
Because your heavenly Father cares and loves you so.
He wanted you to remember to talk to Him, you know.
Gather a small stone, a square piece of fun fabric, a piece of ribbon, and a copy of the poem (hole punch).
Place the stone in the center of the fabric square.
Gather the fabric around the stone and secure it with a piece of ribbon (knot).
Punch a hole in the corner of the poem and then run the end of the ribbon through the hole.
Tie the ribbon into a bow.


Putting God First- Object Lesson to share with the children as well as a craft to make and take home as a reminder to PUT GOD FIRST!
A fun and visual object lesson that reveals where our priorities lie.
Easy to create and leaves a memorable impression.
Allow the children to make their own "priority Jar" to take home, share, and place in their room as a constant reminder to "PUT GOD FIRST" each morning.
To begin your object lesson, have a whiteboard handy.
You will need a small jar (with a lid), rice, and a walnut (you can replace the walnut with a ball or any round object approximately the same size as a walnut).
Ask the children how they spend their day. List each reply on the whiteboard...go to school, watch TV, hang out with friends, etc.
Add some rice to your jar each time an answer is given.
Fill the jar to the very top.
Then try to add God (the walnut) to the jar and put the lid on.
There is no room left for God. We have spent our entire day doing different things, and we have not left any time for God.
Pour the rice back into the original container or a large bowl and try again...this time, add God first (place the walnut in the jar first)
Go down the list on the board and start adding the rice back into the jar. Put ALL the rice that you dumped out back into the jar.
Then put the lid on the jar.
Everything fits!!!
When we put God first, everything else falls into place!
As an object lesson, you may want to choose a larger jar so the children can see it better. As with all object lessons, give it a test run before class so that you are familiar with it.
FYI - You can add three walnuts to represent the Father, the Son, and the Holy Spirit if you want to expand on the trinity.
Afterthought...A rock would work even better than the walnut! Share that Jesus is our ROCK! In fact, a rock and sand may work as well. (I wish I had thought of that before I took the pics. Ha!
Adjustable Salvation Bracelet

For this bracelet, you will need:
Pony beads - Red, black, white, blue, green,
yellow, and clear.
A strip of leather or soft, durable string.
String all the beads...except for the clear bead.
Center the beads on the string and tie a
knot on each side to secure the beads in the center.
Run one end of the leather through the clear bead.
Going the opposite direction, run the second end of the leather through the clear bead.
Tie a knot at both ends. This will allow you to make
the bracelet larger or smaller.
The black bead represents Sin. We are all sinners.
The red bead represents Jesus’s blood, shed on
the cross for each of us. Jesus died for each of us.
The white bead represents the forgiveness of our sins.
Our sins are forgiven when we admit we are a sinner,
ask Jesus to forgive our sins, and accept Him as our
Lord and Savior. When we do that, our sins are
washed away.
The blue bead represents Baptism - Where we publicly acknowledge...in front of everyone that Jesus
is our Lord and Savior. We put away all of our old sinful
ways and choose a new life...a life of living with and for Jesus.
The green bead represents Growth.
When we live a life for Jesus, we will continually
grow in God’s Word and God’s Ways.
The yellow bead represents Heaven - When we
accept Jesus as our Lord and Savior, our sins are
washed away. Nothing is separating us from God.
So when we die...we will go to Heaven, where the
streets are made of gold...and we will live with Jesus for
all of eternity.
We don’t know a lot about Heaven but we do know that it is a place without sin. There is no sadness in heaven.
In Revelation 21:21, we read this:
The twelve gates were twelve pearls, each gate made of a single pearl. The great street of the city was of gold, as pure as transparent glass.
This is represented by our clear bead.


Bouncy Ball
Bouncing Back When Life Gets Tough
Sticking With Jesus
Ingredients:
Borax
Corn starch
Elmer's Glue
Warm water
Food color (optional)
Measuring spoons
2 bowls
What To Do:
Bowl #1
Add 2 tablespoons of warm water
Add 1/2 teaspoon of Borax
Stir to dissolve the Borax as much as possible.
Add food color to this mixture if desired & mix.
Bowl #2
Pour in 1 tablespoon Elmer's Glue
Add 1/2 teaspoon of the above Borax mixture
Add 1 tablespoon corn starch
DO NOT MIX!
Let mixture stand for about 15 seconds
After the 15 seconds has passed, mix the ingredients until it becomes too hard to stir. You will be able to tell when the time is right -it will get clumpy and combined together.
At that point, take out the mixture into your hand and quickly knead it in a circular pattern to form your ball. (Think of when you make a ball with play dough.) Be quick when forming your ball
It starts out as a sticky, gooey mess but it quickly starts to solidify so you must mold it quickly.
.jpg)
Upside Down and Backwards Day


Looking for something new to celebrate the ending of Daylight Saving Time?
Try a Backwards Day!
Children will wear their hats, shirts, etc backward and when they check in, they will be met with LOTS of surprises!
Provide the children with a "Welcome My Name Is" name tag and have them write their names backward. Don't forget to greet them with your own backward sticker in full display.
-
Call children by their last name.
-
Turn some items in your room backward...tables, chairs, posters on the walls, etc.
-
Allow the children to sit in their chairs backward.
-
Run your service in reverse order...closing announcements first...all the other stuff and then the opening songs (or whatever you do first) last.
-
Teach from the back of the classroom instead of the front.
-
If you have several teachers who teach different things throughout the morning, have them teach in a different area.
-
Read a short book... the last page first and flipping towards the front.
-
For a snack, serve them their snack (such as a cupcake) upside down in the cup and their drink in a bowl.
-
For game time, play games where they run, walk or skip backward.
-
If you form a line, allow the last child to lead out and everyone else follows. Do a contest to see who can recite the alphabet backward the quickest. etc.
-
As a lesson for the day, teach on how God made the sun stand still for an entire day...Joshua 10. Or any strange lesson from the Bible.
Let your imagination run wild.
Rain Sticks


Prior to class:
Purchase one cardboard mailing tube for each child. rice, and 2” nails (smaller if the tube is not 2” across)
From here, you can decide how much you will do prior to class and how much your children are capable of doing themselves. If you allow them to do the painting, then you would want to do this craft over 2-3 weeks working on it a little at a time.
Pound nails into cardboard tube– spiraling the nails up and down the tube.
When you look into the tube, you should see a maze of nails going in every direction.
Roll masking tape around and around the tube, covering all of the nail heads. Don’t be neat, you need it to look rough when it is finished.
Once you have put tape around the entire tube, Take your hands and rub them around the tube. Up and Down. This is where it will begin to look like an actual piece of wood.
Paint the tube black.
After it is dry, take green paint and just lightly feather it up and down the tube. This will give the tube a tree looking effect. (Note you can use a dark brown first and then a lighter brown on top instead of green. Or you can use a black with light brown on top.)
Place glue on one cap and snap it onto the tube. (Make sure all ends are glued EXTREMELY well before putting the rice into them. The last thing you want is a bunch of rice everywhere)
Pour approximately1 1/2 cups of rice into the tube
Run glue around the other cap and snap it onto the tube
For added security, Place tape around both caps. This will keep the caps on until the glue has dried
Wrap a piece of string (hemp works well and is natural-looking as well) around the tube, two or three times, and tie a know. Make sure you leave a piece of string hanging about 8 inches on each end of the string
String beads along each string and tie in a knot at the ends
Stick a feather down through the beads so that the quill end is sticking in through the beads and the feather end is sticking out. Glue into place so it does not come out.
Turn the tube over and over to hear the rain sound.
Fish/Whale Paper Plate
God Made the Fish, Jonah and the Whale, etc.
Who doesn't like a good Fish Story?
You will need
A Large Paper Plate
Construction Paper (Various colors-optional)
2 Wiggle Eyes
Glue
Fold the paper plate in half
Cut out the various pieces from the pattern page. I use a different color for each piece but you can use the same
color for each pattern if desired.
Open the paper plate and glue the tail fin (#1) onto the edge. (The whole fin will stick out
except for the straight edge that should be glued to the plate)
Close the plate and glue the insides together.
Glue the top fin (#2) to the top edge of the plate.
Flip the plate over and glue the last fin (#3) into place.
Glue the two oval circles (#4) onto the front portion of the fish. Making sure they extend above the plates edge.


Brushing Up On Your Bible
Looking for a fun way to remind your children (or yourself) to read their Bibles and memorize scripture? Repetition is one of the most effective ways to learn.
Starting at the beginning of the Bible, or the beginning of a specific book from the Bible will help children put what they are reading into context much more than choosing random verses.
Providing the 7 cards for them each week will further encourage them to read their Bibles every day!
Memorizing is awesome...but meditating and hiding His word in our hearts...applying it to our lives...is equally important.
When we do this...those verses stick. Even if we can't quote them word for word...they stick!

Pastor Appreciation - Balloons
Looking for something different for Pastor Appreciation Day?
Imagine the look on his/her face when they open their office door and find a gazillion balloons stuffed inside their office.
Simply inflate a gazillion balloons and stuff his/her office FULL of balloons.
Attach a "Just popping in the say how much we love and appreciate you" sign on the door with a large pin attached to it for popping the balloons.


Father's Day - Hershey Bar
Looking for a fun treat for your children to hand out on Father's Day?
Simply download the wrapper, cut it out, wrap it around a full-size Hershey bag, and tape...That's it! Easy Peasy!
If you have a child who does not have a father, download the "Thank You for Investing In Me" or the "You're My Superhero" label so that child can create a bar for someone that has been influential in their life. Pastor, teacher, someone from the church, neighbor, uncle, step-father, etc.


Mother's Day - "Sweet Treat" Hershey Bar Wappers
Looking for a fun treat to pass out on Mother's Day?
Simply download the wrapper, cut it out, wrap it around a full-size Hershey bag, and tape...That's it! Easy Peasy!


Mother's Day - Tea Cup Craft
Looking for an easy, inexpensive craft for Mother's Day?
Create this easy craft using simple craft supplies plus a tea bag.

Mother's Day - Washer and Dryer Craft
Create this cute "Play on Words" craft for Mother's Day by using a paper towel (dryer) and a metal washer (washer).
This Mother’s Day, you deserve the best.
A gift that is totally unlike the rest.
I considered a new car or even a cruise.
But decided on something you could really use.
Finally, I found you a gift to admire.
I hope you enjoy your new washer and dryer.


.jpg)
Meet The Teachers


Meet the Teacher!
Most schools host an open house where children and parents meet their new teacher.
Why not set a Sunday morning aside for children and their families to come and meet their teachers at church? You can host a drop-in before Sunday school, during Sunday School, or any time that works for your particular church.
Have your teachers fill out the "Meet My Teacher" forms and hand them out to each family. It's also a great time to have the parents fill out new child information forms, bus rider forms, field trip forms etc.
Serve breakfast to encourage parents to attend...or provide simple refreshments..along with coffee and juice.
I will have the free download available on my website later this afternoon. I'll update this post with a link when I have it ready to go!
Promotion Week
Welcome new children into your classroom with a "Welcome to the Children's Department" Bag.
Just print out the tag, attach it to a bag, punch a hole in the bag and attach a helium balloon.
Then stuff it with fun items, a Bible, a notebook for taking notes, or anything that you would like.
Remember to download the 2 printable parent messages and include them into your bags.


Baseball Cross Craft
Check out this "sweet" craft...with a hidden surprise...a fun game and a framed craft that will actually make it all the way home!
It's the perfect Easter, Sports VBS, Summer or ANYTIME craft that is unique and memorable?

What you will need:
-
Baseballs...and lots of them...one for each child. Check with the Highschool baseball team...they will probably have exactly what you need. I received two 5 gallon buckets of balls.
-
Frames (8X10)...If you can't afford frames then heavy cardboard will work. (If you are making it for the Pastor or for your volunteers...invest in a frame. It makes all the difference)
-
Hot glue and a glue gun
-
Sandpaper (if you are using frames)
-
Black or brown spray paint if you are using frames)
Before You Begin:
-
Remove the back and the glass from the frames and set them aside. (Adults will be assembling the frames when done...kids WILL NOT be handling the glass)
-
Spray paint the frames either black or brown
-
Run copies of the frame tags
-
I burn around the edges however, it is a lot of work and you must do it over a sink for the ones that start burning too fast and get away from you. Simple tags are fine...or you can brew a cup of coffee or tea and sprinkle the tags and allow to dry.
-
Cut the strings on the balls...Just use a razor blade knife and run it along the seams.
-
Test one of two to see if your kids are old enough to remove the skins from the balls themselves. You may also consider getting help from your men's group. They loved getting together and removing the skins for us...and it was a great way to get them involved in the children's ministry..
-
ONE BALL MAKES ONE CROSS...THERE ARE TWO PIECES TO THE BASEBALL SKIN
Time to create!
-
Give each child some sandpaper and allow them to scuff up their frames (Kids LOVE to sand)
-
Give each child the CARDBOARD backing to their frame.
-
Allow each child to arrange their ball skins into the shape of a cross, glue them down and press for a couple of minutes.
-
Helpers may have to go back later and add some hot glue behind each piece to make sure that it does not fall off.
-
Give each child a tag and allow them to glue the tag onto their craft.
What's Next?
After the skin is taken off of each baseball, you will be left with a ball of string. Hidden inside each ball of string is a little tiny rubber ball (See photo below).
Have one of the tiny balls available to show the children.
Give each child one ball of string and have them locate the starting point of the string.
On "Go" each child will start unwinding their ball of string. The object is to get to their rubber ball first. You may want to do this in rounds if you have a lot of kids. It takes a lot of room and the balls will be rolling everywhere.
NOTE: The string will occasionally break. If it does, they simply find a new starting place on their ball and continue to unwind.
FUN! FUN! FUN!
Rubber balls are tiny so use your discretion as to whether they go home with the kids or not. You can always give them to the parents and let them be the judge.
This is a perfect game for the theme of God looks at the inside...not the outside!
While the children are playing the game, have your helpers work on re-assembling the frames...or send them home later.
Use caution when working with the glass!!!
FYI: Empty frames create a perfect photo opportunity...See pics below!


Chalk Board Thoughts
Keep a small chalkboard handy for "Chalk Board Thought" just pull it out at random times and ask the children what their thoughts are on different subjects, what their take away from the lesson was, what their take away from the day was, etc.
The "Chalk Board Thoughts" are great for camp. Put the pics into a slide show and play it for your church members when the children return from camp...AMAZING response from your members!


Campfire Cones
What could be better than an Oooey, gooey, campfire cone? Nothing
And what makes it even better is that you do not have to build a campfire to enjoy!
Follow a few simple steps:
1. Take a sugar cone, stuff it with all your favorites...chocolate chips, white chips, butterscotch chips, caramel bits, sprinkles
and LOTS of mini marshmallows etc. (It's up to you!)
2. Wrap it in aluminum foil
3. Toss it in the campfire...or the oven.
4. Leave it long enough for everything to melt together.
5. Remove it from the fire
6. Enjoy!


Jesus is the Light
Painted Lantern Craft
Create these sweet lanterns using items that you probably already have
lying around the church
7 easy steps
Gather Your Supplies (You can use any jar that has a rim)
Design your jar with foam stickers.
Lightly spray paint your jars
Allow the paint to dry completely
Remove Stickers
Attach String and handle
Place Battery operated light inside


Salt and Light Nightstand Lanterns, Candles or Gift Jars
Salt and Light Jars - Simple craft using items you probably already have or are easily accessible.
Perfect "Salt and Light" nightstand craft, Mother's Day Candle, or Thank You gift for anyone who has poured salt and light into your life!
.jpg)
Choose a colorful piece of tissue paper...or small bits of many colors.
Thin the glue with water (any thickness)
Cover the entire outer surface of the jar with glue.
Cut the tissue paper to the correct size (you may choose many
colors or shapes of tissue paper instead of a solid color...it's
up to you.
Cover the entire outer surface with tissue paper, don’t leave any gaps
between the bits of paper...except for the top of the jar...stop at the neck.
Give the jar another thick coat of glue...gluing down all the
tissue paper.
While wet, roll the jar in salt, covering all the tissue paper.
Allow to dry. Attach a ribbon and tag.
Add the light.
Note: If you are passing out tea lights, you can add a little salt (or bath salts) into the bottom of the jar and press the tea light down into the
salt a little way for stability. If using battery-operated lights, you could add a little baggie of bath salts for mom to enjoy.
Thank You Jars


The PERFECT gift!
What better way to show someone how much you care than by putting it into words.
Several years ago, my daughter gave both my husband and myself "Thank You" Jars.
On the outside, it's just a simple little jar with a "Thank You" tag attached with Rafia but it's what's in the jar that is so special.
Inside are little handmade cards with Thank You notes for something that we had done for her in the past. Wonderful childhood memories!
Each morning, you take one "Thank You" from the jar and read it.
Each morning a new memory!
I have read these Thank You's over and over again...and they always bring a smile to my face!
Try them out with your kiddo's!
Mom's will love them.
Create them for your volunteers!
They will cherish them!
Have your children search the scriptures for a few "mom" verses to add to their jars.
Here are a few good ones to get you started.
Proverbs 31:25-26 - She is clothed with strength and dignity; she can laugh at the days to come. She speaks with wisdom, and faithful instruction is on her tongue.
Proverbs 31:28-29 - Her children rise up and call her blessed; her husband also, and he praises her: “Many women have done excellently, but you surpass them all.”
Psalm 139:13 - For you formed my inward parts; you knitted me together in my mother's womb.


Spa Day - I Feel Loved
It's Spa day...and who doesn't like a trip to the spa?
A Spa day can be as elaborate or as simple as your time and budget allow.
You can host your own girl's spa day, a mother/daughter spa day, visit a salon, have someone from a salon do manicures and pedicures at the church, have each girl do someone else's nails, etc.
The sky is really the limit.
One special place to implement a salon day is at camp. We all have downtime at camp so why not host a "Spa" day in your cabin?
Take plenty of polish, face mask, moisturizer, warm wash clothes, towels, etc. and invite everyone from your cabin to participate. (Look for non-allergenic or gentle products. Before sharing with other churches, check with their leaders.)
Don't forget the adults in your cabin...they need a spa break too and allowing the girls to pamper them a
little is a great way for them to interact with their girls.
It's a great way for your girls to meet children from other churches.


Ice Cream in a Bag
Recipe
Looking for a "cool" treat for a
hot summer's day?
This homemade, creamy treat is a summertime delight for kids and adults alike.


Shake, shake, shake...shake, shake, shake...Yummmmm!
That's the sound you'll hear as your children whip up a batch of cool, creamy, yummy
"Ice cream in a Bag."
What you will need
Sugar (1 Tbsp per child)
Milk (1/2 cup per child)
Vanilla (1/4 tsp. per child)
Rock salt (Ice Cream Salt) 6 Tbsp. per child
1 pint-size plastic food storage bag (per child) (I purchase 2 per child and double bag)
1 gallon-size plastic food storage bag (per child)
Spoons (1 per child)
Old towels in case of spills, melting ice or one per child for good measure!
Ice cubes or bags of ice (I buy bags of ice.) Purchase enough ice to fill 1-gallon bag 1/2 full...plus extra for refills if the ice melts too fast...depends on the time of year. The more ice and salt you use the quicker it freezes.)
How to make it
-
Fill the large bag half full of ice
-
Add the rock salt.
-
Seal the bag.
-
Put milk, vanilla, and sugar into the small bag, and seal it.
-
Place the small bag inside the large one, and seal it again carefully.
-
Shake until the mixture is ice cream, which takes about 5 minutes.
-
Wipe off the top of the small bag, then open it carefully. Enjoy!
Tips
-
Allow the children to measure and mix their own ice cream...It's something they will remember forever. Adult supervision is needed of course!
-
Create your ice cream outdoors or on a tile floor (in the gym, on the sidewalk, etc)...accidents do happen.
-
I always double bag the milk, vanilla, sugar mixture. Just place one small bag inside the other and THEN place the double bag inside the large bag. Some kids can get a little excited and shake too hard.
-
1/2 cup milk will make about 1 scoop of ice cream, so double the recipe if you want more. But don't increase the proportions more than that -- a large amount might be too big for kids to pick-up because the ice itself is heavy.
-
Ice does get cold. If a child's hands get cold; or the get tired of shaking, have them place their bag on the floor and turn over and over and over. An old bath towel to lay the bag on may be a good idea. Children would place their bags on top of the towel to turn it over and over on the towel.
-
If the ice cream does not harden, add more rock salt to the ice bag.


Campfire Banana's
Oooey-Gooey Treats
Campfire VS Oven
Either method works perfectly!
Just slice open a banana, fill it with sweet goodies, wrap it in foil and toss it in the campfire...or oven!


Winter, Spring, Summer or Fall, this treat is absolutely perfect!
The best part...kids can do it their selves!
What you will need
Banana's
Foil
Knife (plastic will work just fine)
Spoons or forks (for those who do not want to eat straight from the foil)
Chocolate Chips
White Chips
Butterscotch chips
Mini marshmallows
And anything else you want to toss on top.
How to make it
- Roll out a piece of aluminum foil
- Toss a banana on top of the foil
- Slice the banana open
- Fill the banana with all kinds of gooey, yummy ingredients
- Wrap foil around the banana (tightly)
- Toss the banana in the campfire or oven
- Leave banana long enough for everything to melt
- Remove the banana
- Open the foil and enjoy!


Friendship T's
Going to camp?
Need a "downtime" craft?
Add an "old large t-shirt" to your "things to pack" list for each child.
Toss in some fabric paint, a few foam brushes, a paper plate to pour the paint onto and a sharpie or two and you're all set.
Kids will simply paint their hand, press it onto each t-shirt and sign their name under their handprint.
Perfect take home craft!


Prayer Journals
Create prayer Journals for any occasion or series using a few simple items
Composition notebook
Scrapbook paper
Any stickers, jews, stick-on letters, etc.
Just gather a box of crafty items and let their imaginations run wild!
This is a perfect craft for camp downtime. Simply have the children create a prayer journal that depicts the camp theme.


Building Self Esteem
Helping your children build good self-esteem should be a vital
part of your ministry.
Although beauty needs to start from within, the fact is that most people judge by what they can see from the outside.
Help your children see in themselves what God sees in them...Beauty!
One simple way of doing this is photography.
I found this out many years ago while taking senior photos for one of my friend's daughters.
This young girl had self-esteem problems due to her weight. She was a chubby little one from the start and her weight problems continued into her teens.
After taking photos of her for a few minutes, she made the comment "You make me feel beautiful." My comment to her was "You are beautiful." and from that moment on, the photos changed...she changed.
I realized at that moment that giving a child a few minutes of your time...and "focusing" on them...makes all the difference in the world.
I later received a call from my friend. Thanking me for making her daughter feel so special...and beautiful.


Smore' Goodness

Keep the kids coming back each week by doing a camping or campfire series...complete with yummy S'more treats that they create themselves.
All snacks are easy to create and only take a few minutes away from class time.
Teach "action lessons" from the Bible that you would expect to hear around the campfire. Lessons like Daniel in the Lion's Den, David and Goliath, The Fiery Furnace, and other great lessons.
Here are 10 great s'more recipes...how many more can you think of?
S'more Cones
-
Sugar Cones
-
Chocolate Chips
-
Vanilla Chips
-
Butterscotch Chips
-
Mini Marshmallows
-
Aluminum Foil
-
Sharpie
Allow the children to stuff as many of the above items into their cones as possible. Top with a lot of mini marshmallows. Wrap the cones in aluminum foil, write the name on the foil, and toss the cone into the oven. Bake just long enough for everything to get oooey and gooey (300 degrees - 5-7 minutes or in the microwave for 1minute). Peel the foil back far enough to eat.
Old Fashion Smore's
-
Graham Cracker
-
Hershey Bar (3 Squares each)
-
Marshmallow (Regular Size)
-
Aluminum Foil
-
Sharpie
Hand out 1 Graham Cracker (have the kids break it in half...or break it for them before class begins), 1 Piece of Hershey bar (3 squares), one marshmallow, and a square of aluminum foil.
Have the children place one graham cracker on the foil, top it with chocolate and marshmallow, and place the second cracker on top. Wrap the entire s'more in the foil, write their name on the foil, and pop in over...long enough for everything to melt (300 degrees 5-7 minutes.) Peel the foil back far enough to eat.
The Marshmallow Has It
Marshmallows - Extra Large S’moreMallows
Chocolate Bark or chocolate chips - Melted)
Graham Cracker Crumbs
Hand out one giant marshmallow to each child.
The child will dip the end of their marshmallow into the melted chocolate and then into the graham cracker crumbs.
Easy...isn't it?
Fudge Stripe Cookie S'more
Fudge Stripe Cookies (2 per child)
Marshmallows (Regular Marshmallows of S’moreMallows -1 per child)
Parchment Paper
Sharpie
Cookie Sheet
Roll out parchment paper onto a cookie sheet.
Write each child's name on the parchment paper...leave enough room between each name to place the child's s'more.
Have one child at a time come forward and place one cookie face up (chocolate on the inside) on the parchment paper (next to their name.) Place the marshmallow on top of the cookie. Top with the second cookie (face up.)
Bake at 300 degrees for 5-7 minutes or in the microwave until the marshmallows are soft. As soon as the marshmallows are getting soft and melted, they are ready to eat!
Have hand wipes ready...these are gooey!
Teddy Graham S'more Pops
1 Box of Teddy Graham's
1 Bag of Marshmallows
Chocolate Bark or chocolate chips - melted
Sucker Sticks
Give each child one marshmallow and one sucker stick. Have each child stick the sucker stick into the center of the marshmallow. (will look like a sucker)
Kids will dip their marshmallows into the chocolate and then press 2-3 teddy graham's around the sides of the sucker pop!
You may stick the pops in the freezer for a few seconds if you wish.
Chocolate on the Outside...yummy on the inside!
Graham crackers
Marshmallow
Chocolate Bark or chocolate chips (melted)
Sprinkles
Parchment Paper
Sharpie
Cookie Sheet
Line the cookie sheet with parchment paper.
Write each child's name on the parchment paper. Make sure to leave enough room for each child's s'more.
Give each child a marshmallow and 2 graham crackers. (One full graham cracker broke in half.)
Each child will make a marshmallow sandwich with their graham crackers and marshmallow...no chocolate.
Pop in oven (300 degrees) for 5-7 minutes.
Remove graham crackers, dip one end into the chocolate, and add sprinkles. You may want to put in the freezer for a couple of minutes.
Peanut Butter Cup Smore's
Oh my goodness....these are soooo YUMMY!
Use the old-fashioned S'more recipe that is posted about with one change. Replace the piece of chocolate with a Reese's Peanut Butter Cup.
S'more Mix
Teddy Grahams
Chocolate bark or chocolate chips (melted)
Jett Puffed Mallow Bits (or mini Marshmallows)
Wax Paper
Spread the Teddy Grahams out onto a piece of waxed paper.
Melt the chocolate and drizzle over the chocolate.
Sprinkle the mallow bits or mini marshmallows over the top.
Let everything dry
Scoop up and eat!
Brownie S'more Bowls
At home: Whip up a batch of brownies, pour them into cupcake tins lined with cupcake papers, and bake (1 per child)
Pass out the following to each child
-
One small paper plate each
-
Chocolate Chips (teaspoon full)
-
Teddy Grahams (2-3 each)
-
Mini Marshmallows (teaspoon full)
-
One pre-baked brownie cupcake
-
One plastic teaspoon
Have each child scoop out the center of their brownie and fill it with chocolate chips and marshmallows. Microwave each brownie until the marshmallow and chocolate chips are melted.
Stick the teddy grahams on top.
Eat with their spoon.
Hershey's S'more Snack Mix
-
M&M's
-
Honey Made Lil Squares (Graham cracker aisle)
-
Mini Marshmallows
-
Peanuts or salted pecans if there are no allergies.
Set out bowls of each ingredient and allow the child to mix their own...however, they choose.
Set limits on the candy.
You can also add anything to the mix that you choose...chocolate chips, white chips, etc.
Homemade Snow Cone Syrup

Spring is on the way which means that it's almost Snow Cone Season.
Plan ahead and whip up several batches of homemade syrup NOW!
It's quick...it's easy...and it's inexpensive.
Snow Cone Syrup Recipe
1 cup of water
1 cup of sugar
1 packet of Kool-aid
Combine water & sugar & boil for 3 minutes.
Remove from heat, add Kool-aid, & mix well.
Cool & put in containers.
Each batch makes 1 cup of syrup. Double...triple or quadruple to make large amounts.
Although the recipe is basically sugar and water, I still refrigerate....but probably not necessary.
FYI - Skip the snow cone cones and opt for cups with a spoon. Quick, easy and less mess.
Bonus: Invite some of the older ladies in your church to come help whip up several batches of syrup. This is a perfect opportunity to draw them into the children's ministry without them having worked directly with the children.
Whip up enough syrup for your entire summer...don't forget VBS!


Heart Handprint Craft - Valentine Card


A Valentine's gift from the heart!
-
Download Templates Below
-
Gather white card stock, red and/or pink paint, a bowl of water to wash hands, towel, 1-2 foam paintbrush (depending on the age and size of the class),
-
Old paint t-shirts (to protect clothing)
-
Run copies of the template below
-
Have the children sign their names on the bottom and date.
-
Paint hand
-
Press handprint onto the card...forming a heart.
-
Wash and dry hands
Jesus Loves Me This Much Valentine Craft


A Fun Valentine Craft to remind the children how much God loves them!
-
Download Templates Below
-
Gather Red and Pink Cardstock, scissors and paper cutter.
-
Run copies of all templates. Use red or pink (or both colors) copies.
-
Cut out pieces
-
Cut long strips of cardstock to be used for the arms. Size - approx 1" X 11" (Paper cutter works great here)
-
Glue Together
-
Teach the children how much God loves them...lots of great lessons in the Bible!
Valentine's Day Porch Drop
Looking for a Valentine's Day Porch Drop...Attach one of the tags below to a box of Little Debbie's Valentine treats, a box of Conversation Hearts, a heart-shaped sucker, a small box of heart-shaped chocolates, Hershey Hugs and Kisses, a jump rope, a moon pie, or a purchased/baked heart-shaped cookie treats. Add your own devotional, scripture, and a couple of fun treats (optional: a balloon, a couple of pieces of chocolates, a valentine's cards) and you're all set.


Printable and Customized Valentine's Day Cards
Down load and print OR add your own Bitmoji/Avatar to create your own personalized cards.


Easter Story Cookies
A simple visual, interactive Easter lesson to send home with your families. This can also be used in the classroom by simply having a second sheet pan of cookies prepared at home and ready to serve once these are placed into the oven overnight!
Send them on a hands-on journey through the death, burial, and resurrection of Jesus Christ!

.jpg)
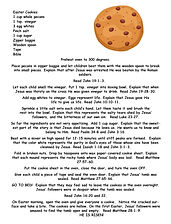
Chocolate No-Bake Cookies and
Bible Scavenger Hunt

Thinking about teaching a "Cooking Class?
These Chocolate No-Bake Oatmeal Cookies are the BOMB!
Go on a scavenger hunt through the Bible to solve ingredient clues.
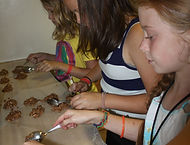
Gather the following items/ingredients
-
2 c. sugar
-
1 stick of butter
-
1/3 c. cocoa
-
1/3 c. peanut butter- (I prefer the crunchy)
-
½ c. milk
-
3 cups of oatmeal
-
Cooking Pot
-
Waxed Paper
-
Wooden Stirring Spoon
-
Tablespoons
Preparation
-
Roll out 3 - 24" pieces of waxed paper onto your counter.
-
Add sugar, butter, cocoa, peanut butter, and milk into the pot.
-
Mix well
-
Bring to a boil
-
Boil for 2-3 minutes
-
Remove from heat
-
Add the oatmeal and mix well
-
Using a tablespoon, scoop out the cookies (batter) and drop them onto the waxed paper. (It works best if you use two tablespoons...one for scooping the cookies from the pan and one for helping to remove the cookies from the scooping spoon onto the waxed paper)
-
Let set to cool
Recipe
Bible Scavenger Hunt
Want to add a little extra twist to your baking series? Have the children take out their Bibles and solve the ingredient clues before you begin baking!
Find the scripture, read the passage, fill in the blank and draw a line to the correct ingredient picture. Downloads are below!
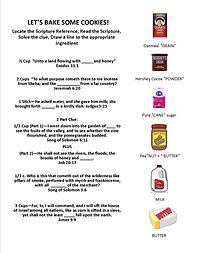


F.R.O.G.
Fully Rely On God
F.R.O.G. (Fully Rely on God) 13 Week Memory Verse Scripture + Coloring Pages.
Challenge your children to a 13-week memory verse challenge...all based around relying on God...something that we all must do!
Make it even more fun by awarding small "Frog" prizes each time the child memorizes their verse.


Send your kids back to school armed with the Word of God.
Download or create bookmarks addressing specific problems that many children may face, along with God's solution.
Copy and create a bookmark for each child or provide card stock, markers, scrapbook paper, etc., and allow them to design a bookmark all their own.
Supply printouts of the scripture for them to paste onto their finished design. Laminate the bookmarks and have them attach a fringe/ribbon to the top.
Note: If the children are making their own bookmarks, cut the blank cardstock bookmarks template larger than the printed scripture sheets that will be glued on top of them. This will give the children room for creativity.
Back To School - WWJD Bookmarks


Paid in Full

Create these sweet "Paid in Full" handprint crafts with your children.
Drive home the point that Christ died for us and that our "sin" debt has been paid in full.
The perfect "Plan of Salvation" or Easter craft!
Make the craft more personal by having the children write their names across the palm/
All you need is some black construction paper, white and red paint, a paintbrush and some hand washing supplies.

Resurrection Biscuits

Resurrection Biscuits - "Great Hands-On Activity"
Note: Scroll down below this post to find the FREE 2-Sided Flash Cards for easy teaching.
Teach your children about Jesus' death, burial, and resurrection by making resurrection rolls/biscuits.
Children will roll out the biscuit, place a marshmallow inside, bake, and then find their biscuits are empty...just like the tomb.
A delicious treat with an important lesson to teach!
Note: If you do not have an oven at your church, you can bake extra biscuits at home for the kids to enjoy at the end of the lesson.
During class, the children will create their biscuits (per the lesson) but instead of baking, the biscuits will be sent home in ziplock baggies to be baked at home. The children will eat the biscuits that you brought.
Once home, children can share what they learned in class, bake their biscuits...and even share a bite with their siblings or parents
What you will need
Biscuits - 1 per child (rolls of regular size biscuits from the dairy section)
Rolling pins (They can share a large rolling pin and pass it around or use small child size rolling pins, or anything you have available for rollig out dough).
Cinnamon
Sugar
Butter (Stick butter - to melt)
Toothpicks
Marshmallows
Cookie Sheet(s)
Parchment Paper or aluminum foil to line the pans and waxed paper for each child to roll their biscuits out on.
Sharpie to write the child's name beside their biscuit (for easy identification)
Prep Work (teaching day)
-
Preheat the oven to 350 degrees (If you do not have an oven at the church, you can simply make the biscuits at home and bring enough prepared biscuits to church the morning of your event. You will go through all of the same motions during class except for baking. Simply place each child's biscuit into a ziplock to be baked at home and eat the ones that you prepared in advance.
-
Place a sheet of parchment paper or aluminum foil onto a cookie sheet.
-
Write each child's name on the parchment paper. Leaving plenty of space between each name so that when you place each biscuit beside the appropriate name you are allowing enough room for your biscuit to grow and ooze without covering the child's name. You may need several cookie sheets depending on the number of children that you have in your class.
Before Class
-
Melt the butter and place in a small bowl (s)
-
Place some sugar and cinnamon in a small bowl (s)
-
Set out toothpicks, a bag of marshmallows, cans of biscuits
When class Brings
-
Pass out one sheet of waxed paper to each child. (They will roll out and prepare their biscuits on the waxed paper)
During this activity, you will have the opportunity to explain each step as you go along. You may add anything to any section below. The teaching is strictly a suggestion. Teach it any way that you feel led.
1. Biscuit
Pass out one biscuit to each child. Tell the children that the biscuit represents the tomb that Jesus was placed in.
Talk about how Jesus’ friends asked for the body and Jesus and how they took Him from the cross and wrapped Him tightly in white linens.
Suggestion: You may want to add actual scripture reference here and have a helper read the scripture when you have finished talking.
For instance: Mark 15:46 So Joseph bought some linen cloth, took down the body, wrapped it in the linen, and placed it in a tomb cut out of rock.
Don't get ahead of yourself by reading the rest of the scripture verse...stop where necessary.
Allow the children to roll out their biscuits when you have finished talking.
2. Place the Marshmallow inside - The marshmallow represents the body of Jesus.
It’s white because it stands for purity and His sinless life.
Place the Marshmallow in the Center of the Biscuit and fold the sides around. Wrap tightly
Add scripture verse if desired.
Allow the children to place their marshmallows inside their flattened biscuit and wrap tightly...no holes...so it can't escape.
3. The toothpick - Before Jesus’ friends were allowed to take Him from the cross, the soldiers wanted to make sure that He was dead. So they took a spear and shoved it into Jesus’ side. Jesus was then taken to the tomb and placed inside. A huge rock was placed in front of the tomb.
Add scripture verse if desired.
Allow the children to secure their biscuits with toothpicks...making sure that all edges stay wrapped.
4. Melted Butter and Spices (Cinnamon and sugar mixed together) - Dip the biscuit into the melted butter....and immediately into the spices (sugar and cinnamon mixed together). When done, place your biscuit, on the cookie sheet beside your name.
When Jesus was buried, there was no time to anoint His body…or to rub it with oil…in the Jewish faith, Jesus had to be buried before sundown on the sabbath. So the next morning…after the Sabbath, a group of women went to the tomb so that they could anoint His body. They brought oil….dunk the biscuit in the butter. And they brought spices…roll in spices. They did this so that when the body started to decay or rot, the spices would cover the smell. The sweet taste of this spice is a perfect reminder of the gift that Jesus gave to each of us…the sweetest gift we will ever receive…salvation. This means that when Jesus died on the cross, he took the punishment that we deserved. He died on the cross so that our sins could be forgiven…and so that we will be able to go to heaven when we die…to live with God forever and ever and ever.
Add scripture verse if desired.
Allow children to dip their biscuit into the butter and then immediately into the cinnamon spice mixture. (You may want to have 2-3 bowls of spices to pass along to each child) When each child is done with their biscuit, they will place it onto the cookie sheet beside their name.
5. Bake...as you close the door...talk about the tomb...the rock that was rolled in front of the tomb. Add anything else that you would like to teach while you are waiting for the biscuits to finish.
6. Open the oven - When the women went to the tomb, they weren’t sure HOW they were going to roll the big stone away…it was big…and it was heavy. BUT they didn’t need to worry about that…because at sunrise, a huge earthquake shook the ground…it shook and it rattled…and it made a terrible noise. And an angel came down from Heaven…and rolled the stone away.
7. If there is any white melted marshmallow goo left inside, you can explain the white
burial cloth that was left behind.


Resurrection Biscuits - 2 Sided Flash Cards
Take your children on a hands-on journey through the death, burial, and resurrection of Jesus Christ by making resurrection biscuits.
Simple 2-Sided Flash cards provide a visual for the children while the back provides easy to follow...step by step topics and instructions for the leaders.
(See the Resurrection Biscuit post above for more information on how to create the biscuits)
PRINT FLASH CARDS USING WHITE CARDSTOCK

Need a little time filler?
Here's a fun game to play with your children this Easter. Perfect for times when "Big" church is running late, or the lesson has ended a little too quickly.
Game – The Stone
Introduce the game by saying: What was rolled away from the tomb where Jesus was laid?
You will need: One small stone.
Directions: Have the children form a circle and sit down.
Choose one student to be “It”.
All the students (except "It") will hold their hands up separately to form a cup, leaving an opening on top, where the stone can be slipped into.
The teacher walks around the entire circle pretending to place the stone in each child’s hand.
One student will actually get the stone.
After the teacher has gone around the circle, all children will lower their hands pretending to have the stone.
The guessing begins with the person who was chosen to be “It” guessing who they think has the stone.
If "It" is correct, then the person holding the stone becomes the new “it.”
If "It" chooses incorrectly, the person guessed gets the next guess.
The Game continues as long as the children are having fun.
(Game is like “Button, Button, Who’s Got the Button? ").
“The student with the stone becomes 'It' in the next round.
To make the game even more fun, give a bit of trivia about Jesus’ death or burial between each round.
.jpg)
Simple Cross Craft with a BIG Impact!


Simple Cross Craft with a BIG impact!Use this cross craft while teaching about The Resurrection, Crucifixion, The Plan of Salvation, or anytime!
Just cut out the cross and one of each of the 7 colored squares per child, and you're all set. Teach your children about the great sacrifice that Jesus made for each of them!
If you would like to hang your crafts, simply use a hole punch and punch a hole in both corners of the cross beam

The Easter Nail
Drive home the extreme sacrifice that Jesus made for each of us with this visual reminder craft.
A simple 6-8" spike nail, with a bow and "The Easter Nail" poem attached.
The nail is to go inside (or attached) to each child's Easter basket as a reminder of Jesus' great love for them. When Easter is over, the nail can be hung in their room.
Purchase One 8" spike nails and one bow per child.
Attach the bow to the nail.
Attach a ribbon to the poem and then tie it to the nail.
Tie the two ends of the ribbon into a loop for hanging.
.png)

.jpg)

Jesus God to Heaven - Ascension

Hands-on cut and paste craft for all ages. Children will physically move Jesus from the mountain top to heaven where He will disappear into the clouds.
1. Cut out the pieces
2. Glue the 4 arrow pieces together...end to end
3. On the BACKSIDE of the cloud template, run a line of glue along the top edge (BACKSIDE) of the cloud piece ONLY!
4. Attach the arrow strip to the top (Backside) of the cloud. Make sure that you do not glue down the entire strip...attach to the top edge only!!! Kids will run the Jesus template up the arrow strip and behind the cloud. If you glue the entire length of the cloud, you will not be able to run the Jesus template up and behind the cloud.
4. Cut out the Jesus piece and then fold the white tabs backward and behind Jesus.
5. Glue the white tabs together but do not glue them to Jesus.
6. Run the arrow piece through the white tabs on the Jesus template.
7. Glue the Hill/Worshipper piece to the bottom edge of the arrow strip.
You can now run Jesus up the arrow strip and behind the cloud.
Easter Bags
Have your children create these fun Easter bags from a regular brown or white paper lunch bag, googly eyes, a couple of pom-poms, and a few cutout pieces (from the free PDF download template) to create a unique and fun Easter activity.
Take it a step further by having them add a little Easter grass and 8 filled eggs with little slips of paper describing what each color represents. (or have them stuff themselves)
Take your children through each color, explaining what it represents. Expand on each definition as you see fit. You can turn this into an entire lesson!
Use crafts separately, or together for even more fun.
A super easy way to teach the lesson of Jesus' great journey from the cross to the resurrection and what it means for each of us.
A Bag Full of Jelly Beans
Fill a clear treat bag with jelly beans (one per child). Using a ribbon, attach the free bag tag. Give each child a bag of jelly beans as a reminder of God's great gift and the sacrifice He made for each of them.
A bag full of jellybeans, colorful and sweet,
reminds me of God’s bounty with this Easter treat!
RED is for the blood Christ gave.
GREEN is for the palm’s cool shade.
YELLOW is for God’s light so bright.
ORANGE is for prayers at twilight
BLACK is for sweet rest at night.
WHITE is for the grace of Christ.
PURPLE is for his days of sorrow.
PINK is for each new tomorrow.
.jpg)
.jpg)
You've Been Egged, Get Egg-Cited or Join us on Easter Sunday invites!
.jpg)
.jpg)
.jpg)
.jpg)
.jpg)
.jpg)
.jpg)
You've Been Egged, Get Egg-cited, or Join us on Sunday! A great way to share the message of the empty tomb or to invite families to your church on Easter Sunday!
-
You will need 12 Plastic Eggs per child/family! (You can use only 6 or 8 eggs if you are on a smaller budget)
-
Fill 11 plastic eggs with a piece of candy, a little trinket, sticker, scripture verses,
-
Leave one egg empty
-
Put all 12 eggs in an Easter treat bag, paper bag, plastic ziplock...anything you choose
-
Download bag tag and attach to the bag of eggs.
-
Hand bags out to your children, drop them on doorsteps, hang them on doorknobs, pass them out at school, hand them out to
neighbors, family, or friends...anyone that you would like to invite to church or share the message or the empty tomb with!
.jpg)
.jpg)
.jpg)
Easter Egg Invite
Need a last-minute, easy way to invite children to church on Easter Sunday?
Create these simple "single egg" invites to pass out.
Send a few eggs home with each child and encourage them to pass them out to their friends.
Run copies of the "Join Us" invite, fill in your church information, fold and stuff it inside a plastic Easter egg and you are all set.
.jpg)

Fall - Nature Scavenger Hunt - Family Fun
Promote family fun time!
Encourage families to take a Nature Scavenger Hunt together...to enjoy God's great outdoors!
Give each child a brown paper bag. Provide leaf templates (paper or real leaves) for them to trace, and cover their bags with fall colors.
Send the bags home with the Nature Scavenger Hunt List and encourage families to go on a nature scavenger hunt together.
Have the children bring their bags back and award a small prize for each family that completes (or even participates) in the hunt.
Tip: If you want to skip the trace and color step, you can encourage families to find leaves and decorate their bags together before beginning their hunt. They can trace and color or attach actual leaves to their bag. Encourage them also to look for their favorite "nature type" or "creation" verse and write it on their bag.

Roll A Turkey - Dice Game
Colorful Turkey - Roll a Dice Game - Color the dots any color you choose to create a colorful turkey!
Looking for an "extra time on our hands" activity? Keep this game on hand and pull it out whenever you need something "last-minute" to fill those awkward "extra time" moments!
.jpg)
.jpg)


TOAST BAR - NEW YEARS OR BREAKFAST BUDDIES
"Toasting" in the New Year! Celebrate New Years' Day with a 10', 20', or even a 30' toast bar. Be creative with all your toppings...and various breads. Children may create cinnamon toast, jelly toast, buttered toast, apple butter toast, etc. Be creative with your toppings!
Line up a few toasters and allow the children to select their own type of bread...and toast it. Then comes the fun part...all the toppings. If you are able to find the individual jellies with the peel-off foil lid...that would be ideal! Same with butter, etc. If not, then having someone place a spoon full of jelly on their plates would work just fine.
Don't forget the plastic knives and spoons for dipping and smoothing! Enjoy!

.jpg)


Pop Tarts and Pajamas
9 NEW designs! Choose your own adventure with any of these 9 new images. Create the event that is
perfect for you and your church!
Perfect for Daylight Saving Time or anytime!


Want more information on a Pop Tarts and Pajamas event?


Friendship/Salvation Pins
These pins are be perfect for "Bring a Friend" day, and even better, as a way to share the gospel.
Create your pins by using the 6 different Plan of Salvation colors... Black, Red, White, Blue, Green, Yellow.
When someone asks about the pins, the child shares the Plan of Salvation and then gives the person a pin to start their own collection. The cycle continues from there...what a super way to share Jesus with others.
It would be so fun to show up in class with your shoes covered in pins, teach the plan of Salvation, and then allow the children to create their own pins.
Have printouts ready to hand out...teaching what each color represents. Something very quick and simple. Break up into teams and allow the children to practice sharing the gospel. Have the children change partners and continue practicing so they will be ready to share the gospel. You may want to consider printing out small cards for the children to share, in addition to explaining the color. I normally do not share ideas from other creaters but this one is so cute that I had to share. Find the original video here: https://youtu.be/ugmUoju9-m4?si=QHbtCC4eekavjda0

Photo and Video Credit - The Kneady Homesteader
Hygiene Flyers (Free Downloads) Fun, Downloadable Hygiene Tips!
Note: Although these flyers were originally created for the 2020 Covid Epidemic (may be never experiemce anything like this again), most are perfect as general good hygiene practices during "cold season" or as "flu school closings" reminders.
Share safe hygiene tips with your kiddo's and parents as you get ready to "Celebrate" together once again!
Download the files below and create your own flyers, slides for the big screen, porch "drop offs", mailers, etc.


THE FOLLOWING FLYER CAN ALSO BE USED AS A "PORCH DROP" OR HYGIENE KIT BY USING THE ADDITIONAL MATERIALS BELOW.
Use this activity as a "porch drop" activity by dropping off a bubble wand (or bottle of bubbles) a bar of soap, the DIY liquid soap recipe, a framed (or unframed) copy of the handprint poem and the handwashing sheet as a reminder to wash their hands often. Attach the tag and you are ready to hit the road. I hope you enjoy getting to see all those beautiful, bubbly faces!
FYI: You can also add Bubly brand sparkling water to your drop-off if you choose.
You can find them at grocery stores or at Amazon.


